


KRAMER: SIMPLE CREATIVE TECHNOLOGY
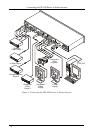
Configuring and Operating your PIP-300
12
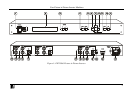
7 Configuring and Operating your PIP-300
You can configure and operate your PIP-300 via:
The front panel buttons, and/or
RS-232 serial commands transmitted by a touch screen system, PC, or
other serial controller
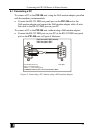
7.1 Using the Menu
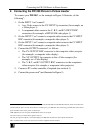
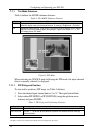
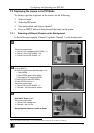
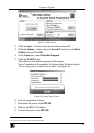
Use the front panel buttons to activate the menu. The menu is displayed
1
on
the LCD display
2
and is also superimposed on the screen
2, 3
.
To use the PIP-300 menu, press the:
ENTER button to display the menu and accept changes
ESC button to move to the previous menu level
,
arrow buttons to select the menu items, size and position the input
display, adjust the numerical rates, and edit the text labeling
,
arrow buttons to position the input display and to edit the text labeling
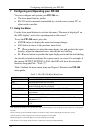
An asterisk in brackets indicates the current status on screen. For example, if
the current OUTPUT SETTING is PAL, the OSD will show the asterisk in
brackets alongside PAL: “PAL (*)”.
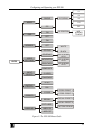
Table 3 defines the main menu items and Figure 5 illustrates the PIP-300
menu guide:
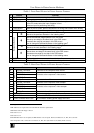
Table 3: The PIP-300 Main Menu Items
Menu Item Function
MODE Select the SINGLE or the PIP mode, see section 7.1.1
OSD Activates/deactivates the OSD menu
4
BORDER Select a border around the image (applies to all channels) and select the
border COLOUR (WHITE or BLACK)
VIDEO SETTINGS Adjust the CONTRAST, SATURATION and BRIGHTNESS (see section 7.1.2)
INPUT SELECT Select between: COMPOSITE video, S-VIDEO or COMPONENT video, per
input channel
OUTPUT STANDARD Select between NTSC and PAL
PRESETS Store and recall PRESETS (1 and 2), or use FACTORY DEFAULT
5
settings,
see section 7.1.3
LABELING Display, remove and edit the text label for the input channel, see section
7.1.4
1 The menu always displays only two lines at a time on the LCD display. Use the up/down arrow buttons to scroll up/down
the menu
2 Upon powering up, the LCD briefly displays the machine’s name, and the OSD displays the firmware version
3 The menu times out after a minute, both on the LCD display and on the OSD
4 Menu still appears on the LCD display even when deactivated in the OSD
5 The machine is set to Single mode, Channel 1, default video settings and default labeling