


Contents
i
Contents
1
Introduction 1
2
Getting Started 1
2.1
Quick Start 1
3
Overview 3
4
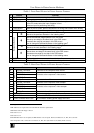
Your Picture in Picture Inserter Machines 4
5
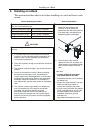
Installing on a Rack 8
6
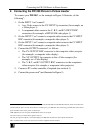
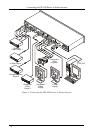
Connecting the PIP-300 Picture in Picture Inserter 9
6.1
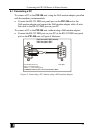
Connecting a PC 11
7
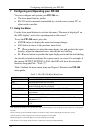
Configuring and Operating your PIP-300 12
7.1
Using the Menu 12
7.1.1
The Mode Submenu 14
7.1.2
The Video Settings Submenu 15
7.1.3
The Presets Submenu 15
7.1.4
The Labeling Submenu 16
7.2
Displaying the Layers in the PIP Mode 17
7.2.1
Selecting a Different Channel as the Background 17
8
Firmware Upgrade 18
8.1
Downloading from the Internet 18
8.2
Connecting the PC to the RS-232 Port 18
8.3
Upgrading Firmware 18
9
Technical Specifications 20
10
Communication Protocol 21
Figures
Figure 1: PIP-200xl Picture in Picture Inserter 5
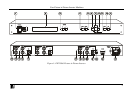
Figure 2: PIP-300 Picture in Picture Inserter 6
Figure 3: Connecting the PIP-300 Picture in Picture Inserter 10
Figure 4: Connecting a PC without using a Null-modem Adapter 11
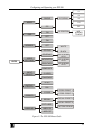
Figure 5: The PIP-300 Menu Guide 13
Figure 6: PIP Mode 14
Figure 7: Goal Screen 19
Figure 8: System Status Screen 19