


EN
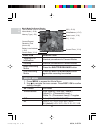
NOTE: All image / movies can be viewed in Playback Mode or the
camera can be used as a TV Cam in Record Mode.
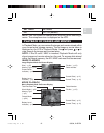
INSTALLING SOFTWARE DRIVERS
(WINDOWS-BASED PC)
Use the USB cable included to connect the camera to your Windows-
based PC. This enables you to transfer, edit, and playback pictures
and movies onto your PC.
Users of Windows 98SE-based PCs must install the software first
before connecting the camera to the computer.
1. Insert the CD labelled "PV100" into your CD-ROM drive. The
installation will start automatically.
2. If the "autorun" feature is disabled on your PC, start the
installation by running [x:\setup.exe] where "x:" is the drive letter
of the CD-ROM drive.
3. Follow the on-screen instruction to complete the installation of
the camera drivers and software. When done, click on the [Finish]
button on-screen to restart the PC.
NOTE: The Macintosh does not require software driver installation.
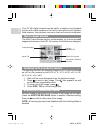
TRANSFERRING FILES FROM CAMERA TO PC OR
MACINTOSH
NOTE: Only the images and movies stored in the camera's current
memory device (SD card or internal memory) will be visible on the PC
or Macintosh.
NOTE: The LCD is automatically off when the camera is connected to
the PC or Macintosh.
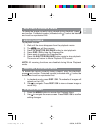
1. Turn on your PC or Macintosh and allow your system's operating
system to boot up.
2. Turn off your digital camera. Connect the camera and your PC
or Macintosh via the USB cable.
3. Turn on your digital camera to any mode. The device's status
lamp will blink.
27
PV100 Eng R7 a OP 9/9/04, 2:45 PM28