


58
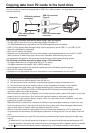
Copying data from P2 cards to the hard drive (1394 HOST mode)
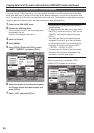
Switching to the 1394 HOST mode
1 Turn on the power of the hard drive (which
supports 1394. a SBP2) to be connected,
connect it to the unit using the IEEE1394
cable, and hold down [POWER] on the unit
for at least 2 seconds to turn on its power.
The thumbnail screen now appears.
2 Press [MODE] to display the thumbnail
display off screen.
3 Press [MENU].
4 Using [STOP], [PLAY] and [STILL], select
“OTHER FUNCTIONS” – “PC MODE”, and
press [STILL].
5 Using [STOP] and [PLAY], select “1394
HOST”, and press [STILL].
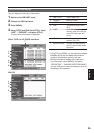
6 Press [MENU] twice to display the thumbnail
display off screen.
7 Press [MODE] to display the thumbnail
display screen.
8 Hold down [MODE] for at least 2 seconds.
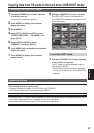
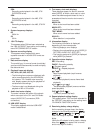
The 1394 HOST mode screen now appears.
12
5
3 4
6
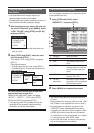
1. Mode display 1394 HOST mode is
displayed here.
2. P2 card slot
number
The numbers of the P2 card
slots where P2 cards have
been inserted are displayed
in white.
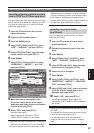
3. Hard drive status
display
The status is displayed
in white if the hard drive
is connected and can be
used, in black when it is
not connected, and in red
when data cannot be copied
because of its formatting or
other reasons. If you plan to
copy data onto a hard drive
indicated in red, format the
hard drive first.
4. Remaining
battery charge
The remaining battery
charge is displayed here.
5. Remaining hard
drive memory
display
The remaining memory and
total memory of the hard
drive are displayed here. “-/-”
indicates that the hard drive
is not connected.
6. Menu display The menu used in the 1394
HOST mode is displayed
here.
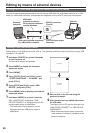
• Connect the unit and the hard drive using the
1394 cable. Do not connect (using a chain or
hub, for instance) a multiple number of hard
drives even if no power is being supplied (to the
chain or hub).
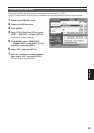
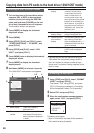
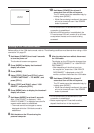
Formatting the hard drive
1 Using [STOP] and [PLAY], select “FORMAT
(HDD)”, and press [STILL].
Then select “YES” using [STOP], and press
[STILL]. Formatting now begins. (Formatting
will be completed in about 2 or 3 seconds.)
2 Select YES, and press [STILL].
3 When the confirmation message appears
again, select “YES”, and press [STILL].
COPY TO HDD
FORMAT (HDD)
PROPERTY
SETUP
Formatting now begins.
• Bear in mind that all the data will be erased on
the hard drive being formatted.