


33
Recording
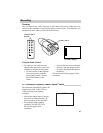
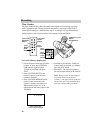
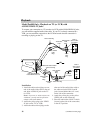
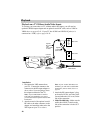
3. Attach the yellow plug on one end of
the included audio/video cable to the
VIDEO OUT jack on the TV or VCR
and the other yellow plug to the
yellow VIDEO jack under the A/V
cover.
Connection
1. Attach the white plug on one end of
the included audio/video cable to the
AUDIO OUT L jack on the TV or
VCR and the other white plug to the
white AUDIO L jack under the A/V
cover.
2. Attach the red plug on one end of the
included audio/video cable to the
AUDIO OUT R jack on the TV or
VCR and the other red plug to the red
AUDIO R jack under the A/V cover.
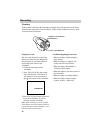
Note: If your TV or VCR is not stereo,
you may need an optional Y-adapter.
Caution: The unauthorized recording of
television programs and other recorded
material may infringe the rights of others.
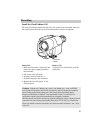
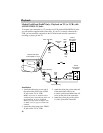
Operation
1. A. Camcorder connected directly to
TV monitor: Turn on the TV and
tune it to the channel you want to
record.
B. Camcorder connected to the VCR
that is already connected to TV:
Turn on VCR and tune it to the
channel you want to record (or
place the cassette you want to
copy in the VCR).
2. Place the camcorder’s audio/video IN
OUT switch to IN.
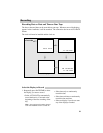
3. Place the tape you want to record on
(with safety tab open) into the
camcorder.
4. Attach a power supply to the
camcorder.
5. Slide the camcorder’s POWER switch
upward to turn on the camcorder.
6. Press the VCR/CAM button to place
the camcorder in playback. The green
VCR indicator will light.
7. Press the REC button on the
camcorder (located under the
viewfinder) to begin recording.
If you are copying a tape, press PLAY
on the VCR when you are ready to
start copying.
8. Press STOP when you are finished.