


62
E
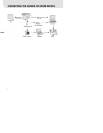
How to set-up the Underwater Housing
Set up camera
1. Insert 2 fully charged Ni-MH batteries (size AA, capacity at least 1800 mAh).
See page 67 for more battery information. Make sure you insert the batteries
with the correct + and – polarity.
2. Clean camera lens with dry, clean cotton cloth.
3. Make sure camera focus lens is set to normal distance. DO NOT SET TO
MACRO.
4. Remove camera strap since this may prevent the camera from correctly
seating itself inside the housing.
5. Set camera to Sea mode. If you are using an External Flash, set camera to
External Flash mode. See page 51 for detailed instructions on how to set
camera to Land, Sea or External Flash modes.
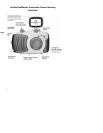
Set up housing
Opening and loading of the housing should be done only in dry cool air,
such as in an air-conditioned room to prevent fogging.
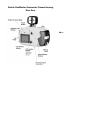
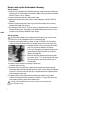
1. Open the housing by pulling up latch on side of housing. Do not extend
housing lid beyond its stop point or damage may occur to the hinge area.
2. Carefully inspect O-ring for damage and make
sure O-ring is firmly seated in its groove.
If O-ring is damaged and requires replacement,
contact SeaLife Service Center (For service
details, see page 58).
3. Clean the housing glass lens port using clean,
dry cotton cloth. It is recommended to apply
anti-fog solution to the inside surface of the
housing lens.
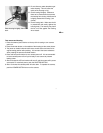
4. Carefully insert camera into housing. Make sure
camera is clean and dry.
5. Insert two Anti-Fog desiccant capsules into special slots inside housing.
Note: New desiccant capsules will be blue in color. As the desiccant absorbs
moist air, it turns from blue to light pink. Replace desiccant capsules when
color changes to light pick.
6. Carefully clean O-ring and inside of housing area where O-ring makes
contact. Use cleaning brush provided in Care Kit. O-ring must not be wet
when sealing housing, allow these areas to dry.
O-Ring must be absolutely clean of all lint, sand or other small particles.
Do not grease O-ring.
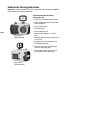
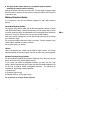
To OPEN:
Push
up
rubber
grip
Pull up
latch