


22
23
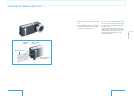
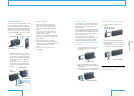
Using the flash
You can take pictures using a flash by
attaching the flash unit (supplied). First, you
need to attach a battery to the flash unit (page
14).
The flash automatically senses how much
light is available and fires depending on
shooting conditions and menu settings. You
can also change the flash setting to Forced
Flash or No Flash (page 35).
The recommended flash range is 0.5 to 2 m (2
to 7 ft). The flash fires approximately 300
times with a fully charged battery (if fired
once every 30 seconds).
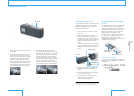
The flash is ready to fire when the ready
lamp on the flash unit lights up in orange.
Make sure your fingers do not block the flash
sensor or emitter when you hold the camera.
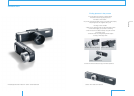
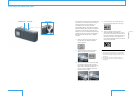
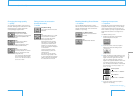
To attach the flash unit, follow the illustration
below. You need to remove the terminal
cover from the camera before attaching the
flash unit. To detach the flash unit, loosen
the locking screw and pull the flash unit
straight out while pressing the release
button.
Flash unit
Release button
Remove the
terminal cover.
Locking screw
Loosens
Tightens
Ready
lamp
Instant shooting from power off
— Direct Shutter
The Direct Shutter feature allows you to take
a picture even if the camera is turned off.
Just press the shutter button and the camera
will turn on automatically and take the
picture. Although Auto Focus and flash are
disabled, you won’t miss unexpected photo
opportunities.
If you take a picture with Direct Shutter and
there is no “Memory Stick Duo” in the
camera or the “Memory Stick Duo” in the
camera is full, the image is temporarily
stored in the camera’s memory and the
camera goes to standby with the image
displayed on the screen. To save the image,
insert a “Memory Stick Duo” with enough
capacity available while the image is
displayed on the screen.
Any operation except for use of the power
button is disabled while the camera is in
standby with the image displayed on the
screen. If you press the power button while
there is no “Memory Stick Duo” inserted, the
camera turns off and the image that is
temporarily stored in the camera’s memory is
deleted. Also, if you do not use the camera
for more than 3 minutes, the camera turns
off automatically and the image stored
temporarily is deleted.
You can disable Direct Shutter to prevent
unintentional operation, such as when the
camera is in your bag (page 37).
Continued on the next page
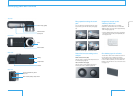
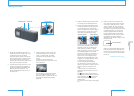
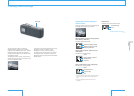
Zooming in
To zoom in, slide your finger from left to right
over the touch pad. Keep your finger on the
right end to zoom all the way in up to x4
magnification. You can also repeat sliding
your finger to zoom in (up to x4, 16 steps).
To zoom out, slide your finger in the opposite
direction (from right to left). Since this feature
is a digital zoom which manipulates images
electronically, the picture becomes grainier
as the magnification increases.
Zoom in Zoom out
Normal x4 magnification
To use conversion lenses
Use the tele conversion lens (supplied) to
capture a distant subject. The tele
conversion lens also throws the background
of a subject out of focus because it has a
shallower depth of field (the range between
the nearest and farthest objects that appear
in focus). When using the tele conversion
lens, the distance between the front of the
lens and the subject should be more than 17
cm (6 3/4 in.).
For wide-angle pictures, use the wide
conversion lens (supplied). Because this lens
has an increased depth of field and takes in
a greater angle of view, it is effective for
photographing a landscape with the entire
image in focus. Nearby objects look larger
and distant objects look smaller so that the
feeling of distance is emphasized.
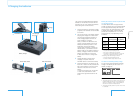
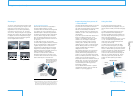
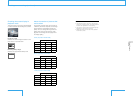
To attach a conversion lens, follow the
illustration below. Remove the caps of the
conversion lens and the lens on the camera
before attaching the conversion lens.
Align the blue dot on the
conversion lens with the
dot on the camera lens
and attach them.
Twist the
conversion lens
clockwise until it
clicks into place.
Note
• To remove the lens hood, pull the bottom of the lens
hood to unlock it and then pull it off, grasping the
top and bottom. Grasping the lens hood from both
the left and right sides may damage the lens hood.
Taking pictures (continued)
Taking & Reviewing
Pictures