


36
37
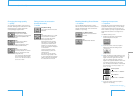
Changing the image quality
— quality
You can select the quality of the picture to
be taken. Settings STD, FINE and TIFF offer
increasing levels of image quality with
correspondingly large file sizes.
FINE (default setting)
Images are recorded in
high-quality (low-compression)
JPEG format (Medium file
size).
STD
Images are recorded in
standard-quality
(high-compression) JPEG
format (Small file size).
TIFF
Images are recorded in
non-compressed TIFF format
with no compression noise
(Large file size).
TIFF cannot be selected when
the consecutive shot mode is
set to on or the hand mode is
set to On or Auto.
Camera menu (continued)
Taking pictures in succession
(consecutive shot)
— mode
Off (default setting)
The consecutive shot mode is
disabled.
On
This setting allows you to take
four pictures in succession
when you keep the shutter
button pressed down.
Approximately four pictures
are taken in 2 seconds while
you keep the shutter button
pressed. In consecutive shot
mode, no images are displayed
on the screen.
Fix the composition in the
finder before you press the
shutter button.
You cannot use this setting
when the image quality is set
to TIFF. Both flash and camera
shake correction are disabled
in consecutive shot mode.
Enabling/disabling Direct Shutter
— d.shutter
You can disable Direct Shutter so that it
will not be set off when the shutter button is
pressed unintentionally, such as when the
camera is in your bag.
On (default setting)
Enables the Direct Shutter
function.
Off
Disables Direct Shutter.
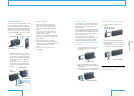
Adjusting the exposure
— exposure
Although this camera automatically sets the
appropriate exposure (AE), you can change
the automatic setting to the exposure you
want. However, you may not get the desired
effect when the scene is too bright or too
dark.
The default setting is +0.0.
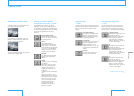
1
Display the exposure compensation
screen using the touch pad.
2
Touch the center of the touch pad to
display the exposure setting screen.
3
Adjust the exposure while referring to the
screen. For a lighter exposure, slide your
finger from left to right over the touch
pad; for a darker exposure, slide you
finger in the opposite direction. Each time
you slide your finger across the touch
pad, the exposure increases or decreases
in increments of 0.3 EV (15 steps, +2.1
EV to -2.1 EV).
Under-exposure
Adjust in the “+” direction.
Over-exposure
Adjust in the “-” direction.
4
Touch the center of the touch pad to
apply the new setting.
Continued on the next page
Menu Options