


30
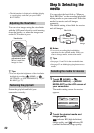
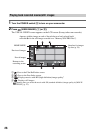
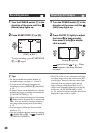
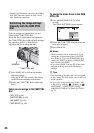
1 Turn the POWER switch C in the
direction of the arrow until the
(Movie) lamp lights up.
2 Press START/STOP F (or B).
To stop recording, press START/STOP
F (or B) again.
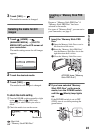
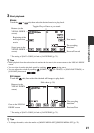
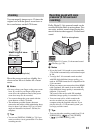
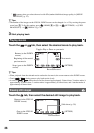
1 Turn the POWER switch C in the
direction of the arrow until the
(Still) lamp lights up.
2 Press PHOTO E lightly to adjust
the focus A (a beep sounds),
then press it fully B (a shutter
click sounds).
appears beside or . When
disappears, the image has been
recorded.
z Tips
• For the recordable time and the number of
recordable images, see pages 11, 24 and 74.
• You can record still images during movie
recording by pressing PHOTO E ([Dual Rec],
p. 32).
• A frame is shown on the detected face, and the
detected face image is optimized automatically
([FACE DETECTION], p. 72).
• When a face is detected during movie recording,
flashes and the detected face is stored in the
index. You can search for a desired scene by a
face image when playing back ([Face Index],
p. 37).
• You can capture still images from recorded
movies (p. 51).
• You can switch the shooting mode by touching
(HOME) A (or D) t (CAMERA)
t [MOVIE] or [PHOTO].
• The LCD screen of your camcorder can display
recording images across the entire screen (full
pixel display). However, this may cause slight
trimming of the top, bottom, right, and left
edges of images when played back on a TV
which is not compatible with full pixel display.
In this case, set [GUIDEFRAME] to [ON]
(p. 70), and record images using the outer frame
displayed on the screen as a guide.
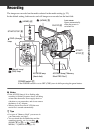
Recording movies
[STBY] b [REC]
Recording still images
10.2M
Flashing b Lights up