


46
Recording
Chapter 3 Recording and Playback
The b mark on the left of “TAKE TOTAL TIME”
changes to a z mark and the z mark on the left of the
setting changes to a ? mark.
10
Turn the MENU knob until the desired setting of
“TAKE TOTAL TIME” appears.
As you turn the MENU knob, the setting of TAKE
TOTAL TIME changes in the following sequence:
5M y 10M y 15M y 20M y 30M y 40M
y 50M y 1H y 2H y 3H y 4H y 5H y
7H y 10H y 15H y 20H y 30H y 40H y
50H y 70H y 100H.
Here M means minutes (5M is 5 minutes) and H means
hours (1H is one hour).
11
Press the MENU knob.
The z mark on the left of “TAKE TOTAL TIME”
changes to a
b mark and the ? mark changes to a z
mark.
12
Turn the MENU knob to move the b mark to “REC
TIME.”
13
Press the MENU knob.
The
b mark on the left of “REC TIME” returns to a z
mark and the z mark of the setting returns to a ? mark.
14
Turn the MENU knob until the desired time to be
recorded on the tape appears.
As you turn the MENU knob, the setting of REC
TIME changes in the following sequence:
5SEC y 10SEC y 15SEC y 20SEC y 30SEC
y 40SEC y 50SEC y 1MIN y 2MIN y
.......38MIN y 39MIN y 40MIN.
Here SEC means seconds (5SEC is 5 seconds) and
MIN means minutes (1MIN is one minute).
You cannot set a REC TIME that is more than one
thirtieth of TAKE TOTAL TIME.
For example: When TAKE TOTAL TIME is set to 1H,
the maximum value of REC TIME is 2 MIN. (60
minutes divided by 30 gives 2 minutes.)
The time setting displayed when you turn the MENU
knob changes within the available setting times.
Be sure to set REC TIME after setting TAKE TOTAL
TIME.
15
Press the MENU knob.
The z mark on the left of “REC TIME” returns to a
b
mark and the ? mark returns to a z mark.
16
Turn the MENU knob to move the b mark to “PRE-
LIGHTING.”
17
Press the MENU knob.
The
b mark on the left of “PRE-LIGHTING” changes
to a z mark and the z mark on the left of the setting
changes to a ? mark.
18
Turn the MENU knob until the desired time to turn on
the light before starting to record appears.
As you turn the MENU knob, the PRE-LIGHTING
time changes in the following sequence: OFF y
2SEC y 5SEC y 10SEC.
• Set the LIGHT switch on the camcorder to AUTO to
turn on the light before recording.
The light switch must also be set to ON. With these
settings, the light turns on and off automatically.
(However, the light remains on continuously if the
off time is less than 5 seconds.)
• When the LIGHT switch is set to MANUAL and the
light switch is set to ON, the light remains on
continuously.
19
Press the MENU knob.
The z mark on the left of “PRE-LIGHTING” returns
to a
b mark and the ? mark returns to a z mark.
20
To end the menu operation, set the MENU ON/OFF
switch to OFF.
The menu disappears from the viewfinder screen and the
message AUTO INTERVAL **M**S indicating Auto
Interval Rec mode appears along the bottom of the
viewfinder.
**M**S indicates the shooting interval. For example,
when TAKE TOTAL TIME is set to 1H and REC TIME is
set to 30 SEC, the message AUTO INTERVAL 00M04S
appears. The shooting interval is 4 seconds.
The display indicating the current status of the camcorder
appears along the top and bottom of the viewfinder.
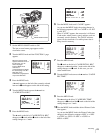
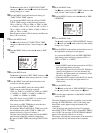
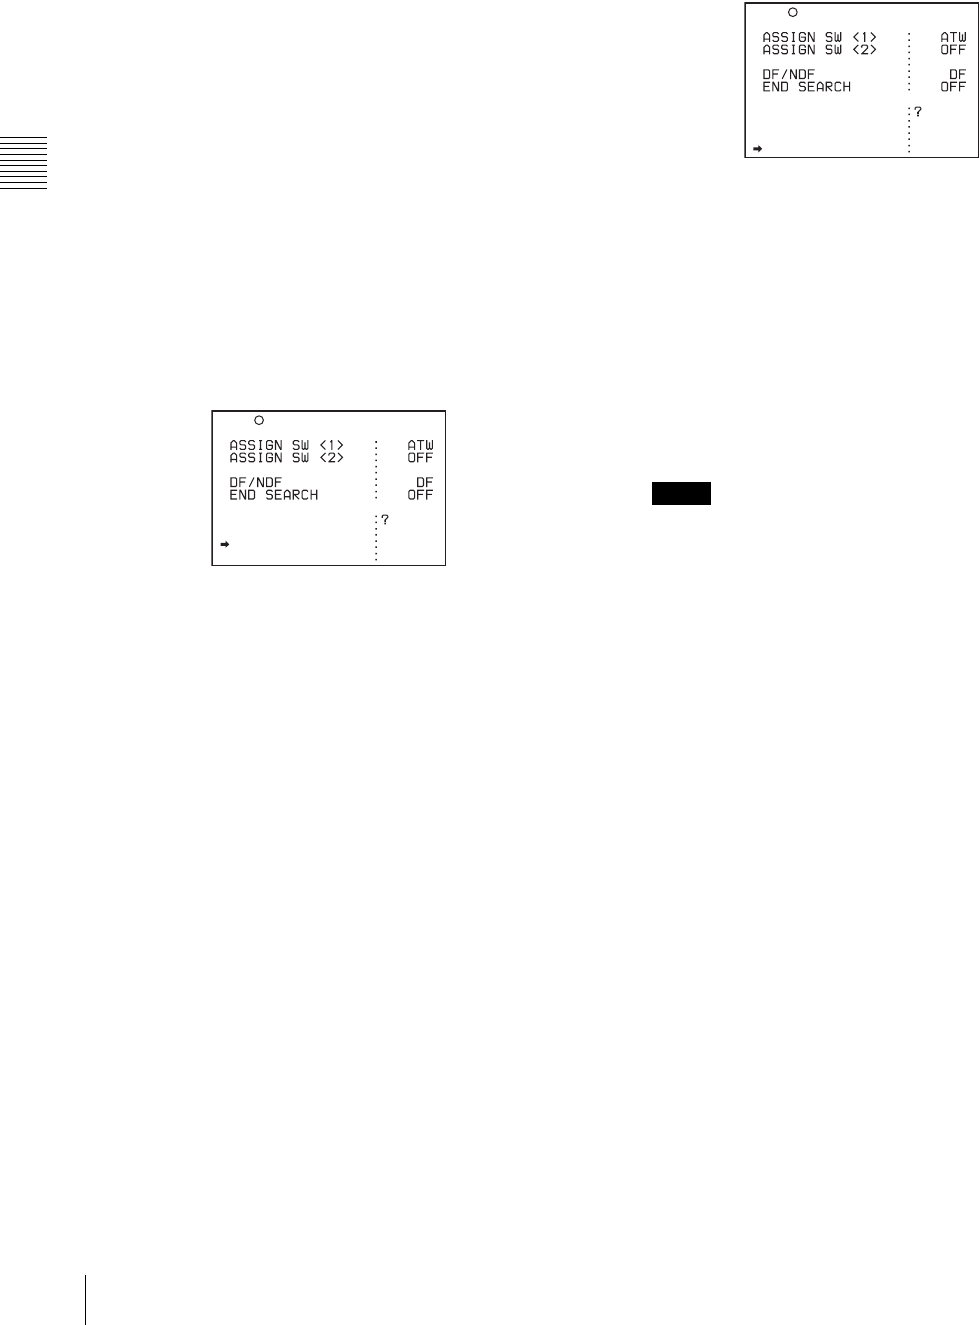
CACHE/INTVAL REC
TAKE TOTAL TIME
REC TIME
PRE-LIGHTING
A.INT
5M
5SEC
OFF
TURBO SW TURBO
U03 FUNCTION1
Notes
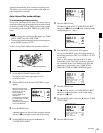
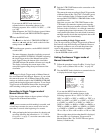
CACHE/INTVAL REC
TAKE TOTAL TIME
REC TIME
PRE-LIGHTING
A.INT
5M
5SEC
OFF
TURBO SW TURBO
U03 FUNCTION1