


Chapter 7 Menu Displays and Detailed Settings
137
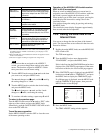
7-3 Adjustments and Settings From Menus
1
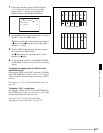
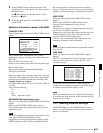
Follow the procedure of steps 1 to 3 described in
7-3-4 “Specifying an Offset for the Auto White
Balance Setting” on page 133 to display the
FORMAT page of the OPERATION menu.
2
Turn the MENU knob to move the b mark to “16:9/4:3
SELECT”, and press MENU knob.
The b mark on the left of the selected item changes to
a z mark and the z mark on the left of the setting
changes to a ? mark.
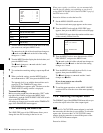
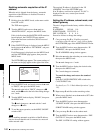
3
Turn the MENU knob to display the desired aspect
ratio, and press the MENU knob.
The z mark changes to a b mark and the ? mark
changes to a z mark.
4
To end the menu operation, set the MENU ON/OFF
switch to OFF or close the cover of the menu operating
section.
To display the aspect ratio of 16:9/4:3 on the
viewfinder screen
By setting the “DISP 16:9/4:3 ID” item on the VF DISP 2
page of the USER menu to “ON”, “16:9” or “4:3” appears
on the viewfinder screen when the aspect ratio of 16:9 is
selected.
For details, see 7-2-2 “Selecting the Display Items” on
page 123.
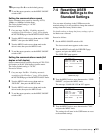
To display “16:9” in color bars
By setting the “SHOT 16:9 ID” on the SHOT DISP page
of the USER menu to ON, you can record a “16:9” mode
indicator superimposed on the color bars.
For details, see 7-2-6 “Recording Shot Data
Superimposed on the Color Bars” on page 126.
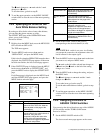
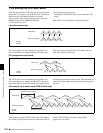
16:9 mode indicator on the color bar display
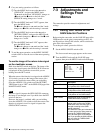
20 FORMAT
16:9/4:3 SELECT : 16:9
SCAN MODE : I
UC/J SELECT : UC
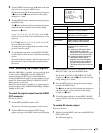
Color bars (SMPTE type)
Color bars (EBU type)