


Chapter 3 Recording and Playback
45
3-2 Recording
6
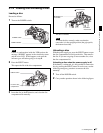
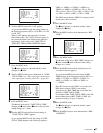
Turn the MENU knob until “CACHE” appears.
As you turn the MENU knob, the setting changes in
the following sequence: OFF y CACHE y A. INT
y M. INT.
When “CACHE” appears, the camcorder is in Picture
Cache mode, where picture, sound, and time code are
constantly saved in memory. The TALLY indicator
(green) is on while picture data is being stored in
memory.
7
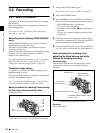
Press the MENU knob.
The z mark changes to a b mark and the ? mark
changes to a z mark.
8
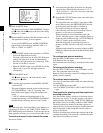
Turn the MENU knob to move the b mark to “CACHE
REC TIME”.
9
Press the MENU knob.
The b mark on the left of “CACHE REC TIME”
changes to a z mark and the z mark on the left of the
setting changes to a ? mark.
10
Turn the MENU knob until the desired Picture Cache
time appears.
As you turn the MENU knob, the Picture Cache time
changes in the following sequence: 0-2s y 2-4s y
4-6s y 6-8s y 8-10s y 10-12s.
11
Press the MENU knob.
The z mark changes to a b mark and the ? mark
changes to a z mark.
12
To end the menu operation, set the MENU ON/OFF
switch to OFF.
The menu disappears, and the display indicating the
current status of the camcorder appears along the top
and bottom of the screen.
Settings made in Picture Cache mode are maintained until
changed.
You can turn Picture Cache mode on and off by assigning
the Picture Cache ON/OFF function to one of the
assignable switches (ASSIGN 1/2/3/4 and TURBO GAIN
buttons), and pressing the switch.
For detailed information on the ASSIGN 1/2/3/4 switches,
see 7-3-5 “Assigning Functions to ASSIGN 1/2/3/4
Switches” on page 133.
Notes
• You can change the Picture Cache mode menu settings
while recording; any changes that you make, however,
do not take effect until after the recording operation is
completed.
• In Picture Cache mode, the internal time code generator
operating mode is always F-RUN regardless of the
setting of the F-RUN/SET/R-RUN switch.
Camcorder operations in Picture Cache mode
The recording procedure in Picture Cache time is basically
the same as that for normal recording. However, note the
following differences.
• When you record in Picture Cache mode, the picture you
are shooting now is recorded to disc after the picture data
stored in memory (equal to the Picture Cache time) is
recorded to disc. For this reason, disc access may
continue for a short time after you press the REC
START button to stop recording. During this time, the
playback control buttons are disabled, as in recording
mode. Also, if you press the REC START button or the
VTR button on the lens to restart recording during this
time, a separate clip is recorded.
• When you press the REC START button or the VTR
button on the lens to restart recording during disc access,
the start point of the recorded clip may be later than the
Picture Cache time, especially when there are a large
number of clips recorded on the disc. In Picture Cache
mode, you should avoid stop and start recording
operations in quick succession.
• The time disc access stops after the REC START button
is pressed equals the Picture Cache time. However, if
you start recording within the Picture Cache time
immediately after selecting Picture Cache mode,
changing the Picture Cache time or performing playback
or recording review, the picture data for the duration of
the Picture Cache time will not be stored in memory.
Thus, the time disc access stops after the STOP button is
pressed becomes shorter than the Picture Cache time.
• In Picture Cache mode, you cannot set the F-RUN/SET/
R-RUN switch to SET to make time code settings. To
make time code settings, first exit Picture Cache mode.
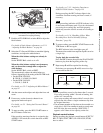
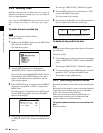
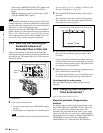
ASSIGN SW <1> : ATW
ASSIGN SW <2> : OFF
ASSIGN SW <3> : OFF
ASSIGN SW <4> : OFF
TURBO SW : TURBO
DF/NDF : DF
CACHE/INTVAL REC: CACHE
CACHE REC TIME : 0-2s
03 FUNCTION1 TOP
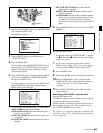
ASSIGN SW <1> : ATW
ASSIGN SW <2> : OFF
ASSIGN SW <3> : OFF
ASSIGN SW <4> : OFF
TURBO SW : TURBO
DF/NDF : DF
CACHE/INTVAL REC: CACHE
CACHE REC TIME : 0-2s
03 FUNCTION1 TOP