


62
Dubbing only desired scenes – Digital program editing
Step 3: Adjusting the synchronicity of the VCR
You can adjust the synchronicity of your camcorder and the VCR.
Have a pen and paper ready for notes.
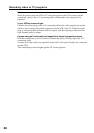
(1) Set the POWER swtich to VCR on your camcorder.
(2) Insert a blank tape (or a tape you want to record over) into the VCR, then set
to recording pause.
When you select i.LINK in CONTROL, the above procedure is not necessary.
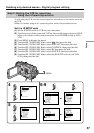
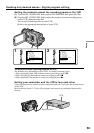
(3) Turn the SEL/PUSH EXEC dial to select ADJ TEST, then press the dial.
(4) Turn the SEL/PUSH EXEC dial to select EXECUTE, then press the dial.
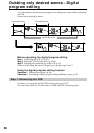
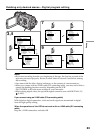
IN and OUT are recorded on an image for five times each to calculate the
numerical values for adjusting the synchronicity.
The EXECUTING indicator flashes on the LCD screen or in the viewfinder.
When finished, the indicator changes to COMPLETE.
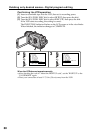
(5) Rewind the tape in the VCR, then start slow playback.
Take a note of the opening numerical value of each IN and the closing
numerical value of each OUT.
(6) Calculate the average of all the opening numerical values of each IN, and the
average of all the closing numerical values of each OUT.
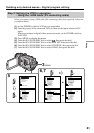
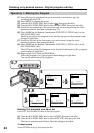
(7) Turn the SEL/PUSH EXEC dial to select “CUT-IN”, then press the dial.
(8) Turn the SEL/PUSH EXEC dial to select the average numerical value of IN,
then press the dial.
The calculated start position for recording is set.
(9) Turn the SEL/PUSH EXEC dial to select “CUT-OUT”, then press the dial.
(10) Turn the SEL/PUSH EXEC dial to select the average numerical value of OUT,
then press the dial.
The calculated stop position for recording is set.
(11) Turn the SEL/PUSH EXEC dial to select RETURN, then press the dial.