


Adjustment
Menu Operation
18
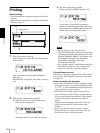
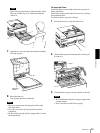
The unit starts the printing of the tone pattern.
5
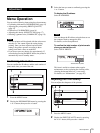
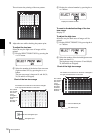
Adjust the tone while checking the pattern print.
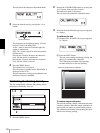
To adjust the low tone
Select the way the light areas of images will be
printed.
1 Display SELECT POINT 95% by pressing the
F or f button.
2 Select the number of the desired low tone area
(light area data 95%) by pressing the G or g
button.
The low tone range is between 01 and 49 (10,
20, 30 and 40 are skipped).
3 Display the selected number by pressing the G
or g button.
To reset to the default setting of the low
tone range
Display 25.
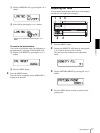
To adjust the high tone
Select the way the dark areas of images will be
printed.
1 Display SELECT POINT 5% by pressing the F
or f button.
2 Select the number of the desired high tone area
(dark area data 5%).
The high tone range is between 51 and 99 (60,
70, 80 and 90 are skipped).
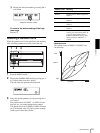
Chart of the low tone range
The next lightest part
The lightest part
The outside
tone of each
box on the
cart is
changed in
the upper and
lower
direction on
the chart.
The inside tone of each box on the chart is changed
in the right and left direction on the chart.
Display the selected number.
Chart of the high tone range
The next darkest part
The darkest part
The outside
tone of each
box on the
cart is
changed in
the upper
and lower
direction on
the chart.
The inside tone of each box on the chart is changed in
the right and left direction on the chart.