


EN-13
User’s Manual
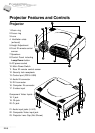
Projector
. ENGLISH .
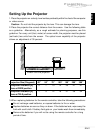
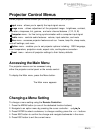
Using the Projector
This section describes projector operations:
Turning the projector and A/V equipment on and off
Adjusting the projected image
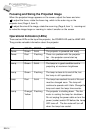
Projector controls
Checking the Projector status
Turning the Audio/Visual (A/V) Equipment On and Off
It is preferable to turn on the projector and related A/V equipment in the following
order: Projector, Computer, Video source, Audio source
Turning the Projector On
1.Connect the power cord to the projector (Page 6 - item 9)
2.Insert the power plug into a wall outlet
3.Remove the projector lens cap
4.Turn on the Main Power Switch on the back of the projector (rocker switch Page 6
- item 10) and note the following sequence:
a) Power LED illuminates solid Red for one second
b) The fan motor will start and the projector runs internal system tests
c) The Power LED changes to solid green indicating the projetor is ready
d) The fan motor turns off, but the Power LED remains Solid Green
5.Press the Power button on either the projector control panel (Page 7), or the
remote controller (Page 8). Notice that the POWER LED will blink twice and the fan
motor will start. In about one minute the LAMP LED will be solid green, as the
projected image comes to its full illumination level.
Turning the Projector Off
1.Press the Power button on either the projector control panel (Page 7), or the
remote controller (Page 8).
2. A message will appear on-screen prompting you to press the Power button
again. Press either power button again.
3. The lamp will turn off, but the fan will continue to run and the lamp LED will flash
orange/yellow until the projector has cooled. The fun will turn off automatically.
4. After the fan has turned off automatically you may turn off the Main Power Switch.