


18
4.2 Configure Your IP Camera Network Settings
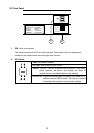
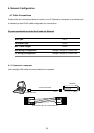
Upon connecting with the network hardware, you need to activate the network function and
configure the proper network settings of the IP Camera.
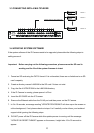
4.2.1 Enable DHCP Function
This function can onl
y work if the LAN, which the unit is connected to, has a DHCP server. If the
DHCP server is working, please move the dip switch points up to 3 on the flank panel; now the IP
Camera will obtain an IP address automatically from the DHCP server. In that case, please skip
section 4.2.2 (Set IP address) and follow section 4.3 (TCP/IP Communication Software).
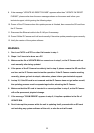
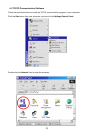
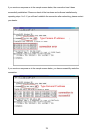
4.2.2 Set IP Address
Y
ou need to set an IP address for the unit if the LAN unit isn’t connected to a DHCP server.
Otherwise, please follow the instructions given below:
Set the IP, MASK and GATEWAY. The following is a sample setting.
IP: 192.168.1.X
MASK: 255.255.255.0
GATEWAY: 0.0.0.0
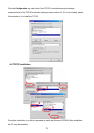
NOTE: When only one unit of the IP Camera is connected to a computer or LAN, you can
freely assign an IP address for the IP Camera. For example, there is a range of IP
Camera IP addresses from 192.168.1.1 to 192.168.1.255. You can pick one for use
from the range of the IP. It’s not necessary to set MASK and GATEWAY; leave the
settings as default.
When an IP Camera is connected to a WAN, you must acquire a unique,
permanent IP address and correctly configure the MASK and GATEWAY settings
according to your network architecture. If you have any questions regarding
those settings, please consult a qualified MIS professional or your ISP.