


70
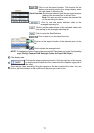
The audio function is available. Press to activate the function
and the icon will turn purple “ ”. Press again to deactivate
the function.
Recording function: The recording function is not available.
The recording function is available. Press to activate the
function and the icon will turn red “ ”. Press again to
deactivate the function.
5
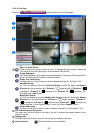
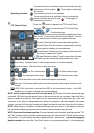
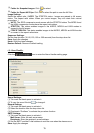
PTZ Control Panel:
Press the
button to expand the PTZ Control Panel;
press the
button to minimize the PTZ Control Panel
, , … : The direction keys
Speed: Here you have a drop down list of speed dome rates
from 1 to 63. 1 is the lowest rate and 63 the highest. You can
set any one of these to control your speed dome rate.
(Preset): Click this button to save the preset position.
(Preset Goto): Click this button to automatically view the
preset position number you have selected.
(Preset Clear): Choose any one preset position and click
this button to delete your choice.
(Preset Position number): There's a drop down list here
from which you can choose the preset position you want.
(Auto Scan): Click this button to view preset positions 1 to 8 automatically.
(Stop Auto Scan): Click this button to stop auto scan.
, and : The Tour function keys. and : The Zoom function keys.
and : The Aperture function keys. and : The Focus function keys.
: Flip: Click this button to turn the camera180 degrees horizontally.
: Zero pan: This button enables you to return the camera to the original direction it was
facing.
: OSD: Click this button to activate the OSD in the dome device menu -- the OSD
enables you to select or change your remote settings.
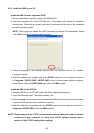
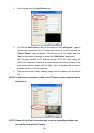
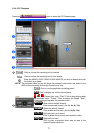
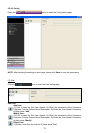
NOTE: Add a camera video onto the Live View area: (1) Click the title of the camera that was
connected. (2) Click the right mouse button of the mouse on the live view area, then click left to
select a camera from the list. The video from the new camera will be displayed. (3) In the Live
View area, if you want to change/delete the videos of cameras or use the snapshot/ full screen
function, you can click the right mouse button again on the live view area, then click left to select.
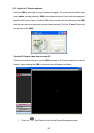
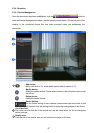
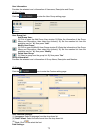
NOTE: When there is a detection of external devices such as a sensor, it will display a red color
bar on the title-displaying area and start to make an alarm sound to warn the user.
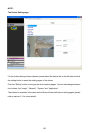
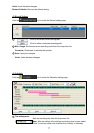
NOTE: How to set the preset position: Choose a preset position number, and then use the "Tilt"
and "Pan" direction keys to find the camera angle you want. Now click the "Preset" button to save
your position. You can similarly set other preset positions -- please note -- by first changing the
position number. Now click the "Auto Scan" button to view preset positions 1 to 8 automatically.