


88
APPENDIX 2. –IP Camera UPnP How To
The most troublesome issue when you setup an IP Camera
®
is that you have no idea what the IP
address of this device is. Now IP Camera
®
supports the UPnP (Universal Plug and Play) protocol
which makes it easier for you to examine it; however, it is a pity that Microsoft Windows XP
®
doesn’t start this service by default. Therefore, the following procedures will help you to turn it on
and discover your IP Camera
®
step by step as shown in Figure1 below.
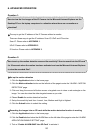
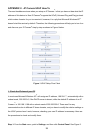
Figure 1 UPnP Setup Flow Chart
1. Check the IP class of your PC
In most case Microsoft Windows XP
®
will assign an IP address, 169.254.*.*, automatically with a
subnet mask, 255.255.0.0, if the DHCP server is absent, while the default IP address of an IP
Camera
®
is 192.168.1.168 with a subnet mask of 255.255.255.0. There won’t be any
communication due to different IP class domains, and you have to modify the relative settings or
the UPnP protocol won’t work; however, checking your own IP address is necessary. Here are
the procedures to check and modify them.
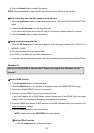
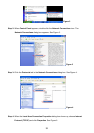
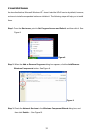
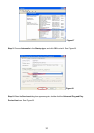
Step 1: From the Start menu, point to Settings, and then click Control Panel. See Figure 2.