


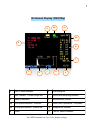


These features work on all camera models supported by CHDK. The camera does not need to have
"related" or "inherent" features already present - CHDK will add the required functionality. New features
are accessed through CHDK-specific menus, rather than the default camera menus.
As CHDK is continually evolving, new features are often added. This means some of the listed features
depend on you using a version of CHDK that has those features.
Check out the Downloads page for information on finding the right build for your needs.
!!Go to:- http://chdk.wikia.com/wiki/Downloads
----------------------------------------------------------------------------------------------
Using CHDK
To Start – !Auto load method
! Cameras that have an SD card that has been prepared as bootable and is locked (write protected,
! with the slide tab on the side of the card), will load CHDK automatically when turned on. This
! is usually called the “Autoload” method, using a camera version specific file “DISKBOOT.BIN”
! The card lock is bypassed by CHDK and photos and video are able to be saved as normal.
! – !Manual load method
! When the SD card has a camera specific file, which for some versions is “PS.FIR”, and others
! “PS.FI2”, the card is left unlocked and then:
1. Switch the camera on in Play mode, not Record mode,
2. Press the MENU button, then press UP once (or scroll down the menu list)
3. An option to update the firmware appears, Select that option. (press FUNC.SET)
4. Confirm the update, (OK-press FUNC.SET)
See:- http://chdk.wikia.com/wiki/Bootable_SD_card
! for instructions to make memory card bootable, and information on the loading process.
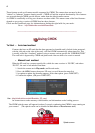
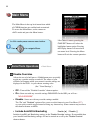
! The CHDK splash screen will appear for about 2 seconds, confirming that CHDK is now running on
your camera. ! (The splash screen can be disabled in Main Menu > Miscellaneous stuff)
! ! ! ! ! ! ! ! !
! ! ! ! ! ! ! ! !
! ! ! ! ! ! ! ! ! ! Splash screen
4