


21
POWER SUPPLY
• Always be sure to use the AD-C620 AC adap-
tor only. Using any other AC adaptor can cause
damage to the camera not covered by the war-
ranty.
• When unplugging the AC adaptor from the wall
socket, be sure to grasp the adaptor (not the
cord).
• Avoid any undue bending, pulling, and twisting
of the AC adaptor’s cord, and never try to
lengthen the cord by splicing it with other wire.
• Be sure to turn power off before connecting or disconnect-
ing the adaptor.
• Always turn camera power off before disconnecting the AC
adaptor, even if the camera has batteries installed. If you
don’t, the camera will turn off automatically when you dis-
connect the AC adaptor. Even so, you run the risk of dam-
aging the camera whenever you disconnect the AC adap-
tor without first turning power off.
• The AC adaptor may become warm to the touch after ex-
tended periods of use. This is normal and is not cause for
alarm.
• After use turn off the POWER switch of the camera and
unplug adaptor from the AC outlet.
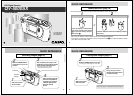
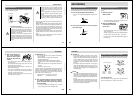
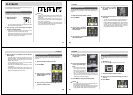
AC power
terminal
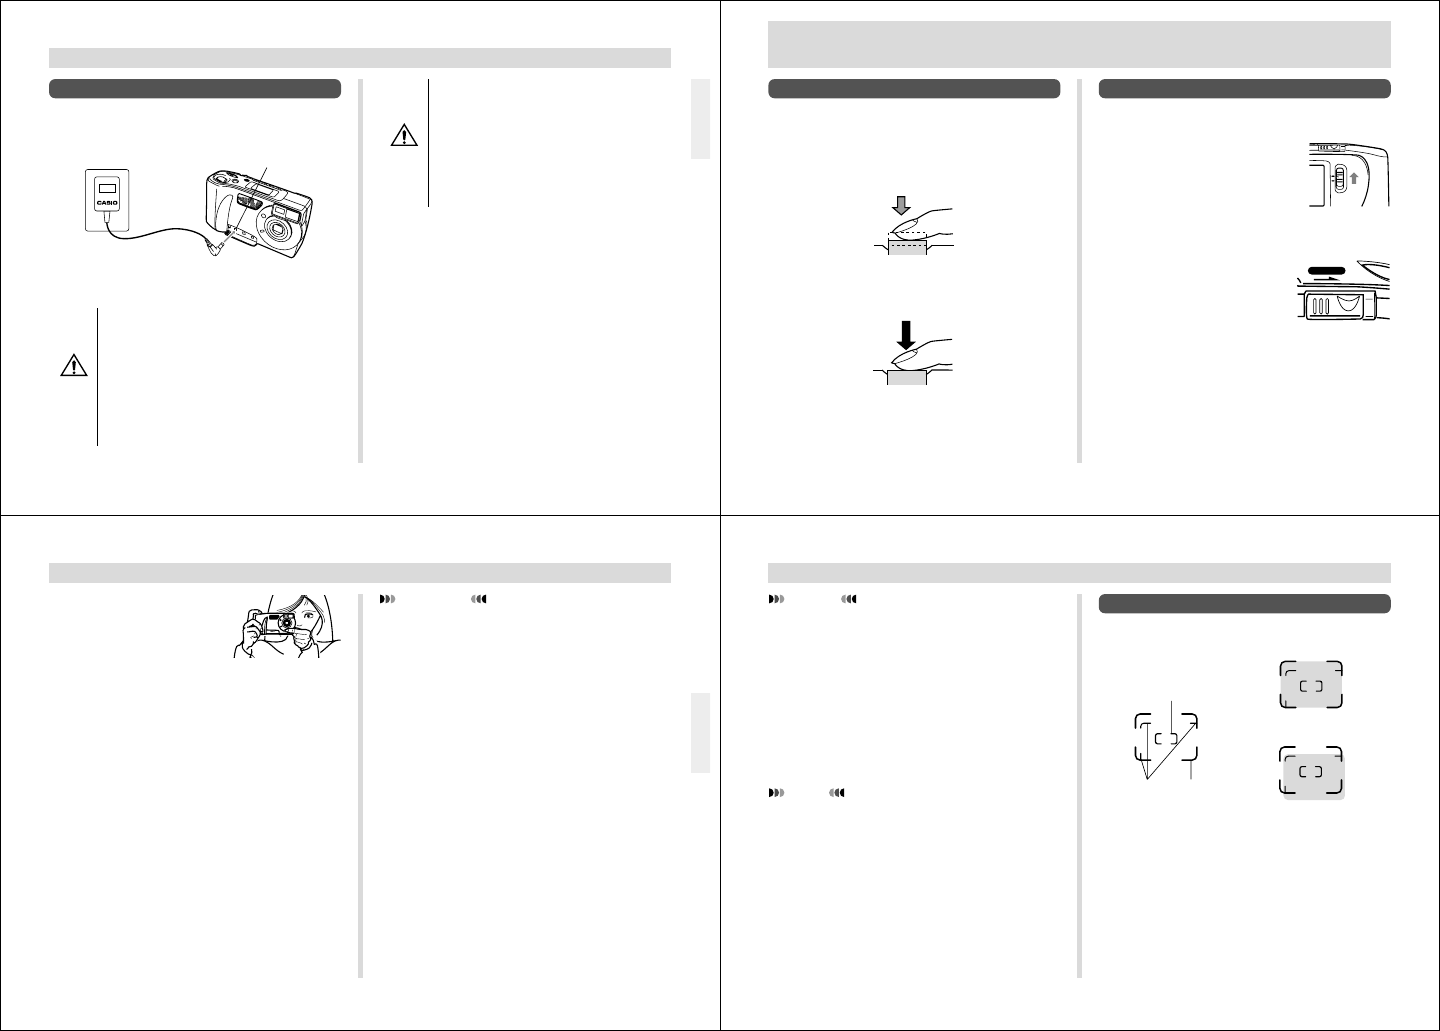
Using AC Power
Use the optional AC adaptor (AD-C620) to power the cam-
era from standard AC power.
AC Adaptor precautions
• Never use an electrical outlet whose voltage is
outside the rating marked on the AC adaptor.
Doing so can create the danger of fire or elec-
trical shock. Use only the optional AC adaptor
specified for this camera.
• Should the cord of the AC adaptor become
damaged (exposed internal wiring or shorts),
request a replacement from an authorized
CASIO service provider. A damaged AC adap-
tor cord creates the danger of fire or electrical
shock.
AC outlet
AC adaptor
CAUTION
CAUTION
22
RECORDING
Basic Recording Operation
The following describes the basic operation for recording
images.
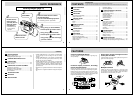
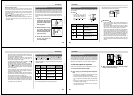
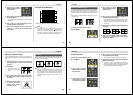
1.
Slide the Function
Switch to REC.
• The REC position selects the Record Mode, while
PLAY selects the Playback Mode.
2.
Slide the POWER Switch
in the direction indicated
by the arrow.
• The POWER Switch returns to its original position
when you release it.
• Turning on power enters the normal Recording Mode.
• You can perform step 2 before step 1, if you want.
• If power turns off, slide the POWER Switch again to
turn it back on.
RECORDING
POWER
ON/OFF
REC
PLAY
Using the Shutter Button
The following steps describe how to operate the shutter but-
ton so that Auto Focus has a chance to focus the image.
1.
Press the shutter button about half way.
• The Auto Focus feature automatically focuses the im-
age.
2.
Press the shutter button as far as it will go to
record the image.
23
RECORDING
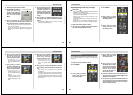
3.
After composing the im-
age in the viewfinder,
press the shutter button
about half way and hold
it there.
• The camera’s Auto Focus feature automatically fo-
cuses the image.
• The operation indicator lights green when the Auto
Focus operation is complete.
• Viewing the subject in the viewfinder, carefully com-
pose it within the frames.
• Take care to avoid blocking the lens with your fingers.
• If you plan to use the LCD to compose the image,
press the LCD button to turn it on.
• Carefully press the shutter button, taking care not to
move the camera as you do.
IMPORTANT!
Auto Focus tends not to work well with the following
types of subjects.
• Solid color walls or objects with little contrast
• Strongly backlit objects
• Polished metal or other brightly reflective objects
• Venetian blinds or other horizontally repeating pat-
terns
• Multiple images that are varying distances from the
camera
• Subjects in poorly lit areas
These cases may make it impossible for Auto Focus to focus
properly, which is indicated by the red operation indicator.
When this happens switch to the Manual Mode for focusing
(page 34). The following are the fixed focusing distances
when Auto Focus is unable to focus.
Well-lit Location: 1.5 meters (4.3') minimum
With Flash: 1 to 2 meters (3.3' to 6.6')
4.
After confirming that the Auto Focus operation
is complete (operation indicator is green),
press the shutter button all the way down to
record the image.
• You can view images immediately after you record
them by sliding the Function Switch to PLAY.
24
RECORDING
CAUTION
• Never open the battery compartment cover, discon-
nect the AC adaptor from the camera, or unplug the
adaptor from the wall socket while the operation indi-
cator is flashing green. Doing so will not only make
storage of the current image impossible, it can also
corrupt other image data already stored in camera
memory.
• Fluorescent lighting actually flickers at a frequency
that cannot be detected by the human eye. When us-
ing the camera indoors under such lighting, you may
experience some brightness or color problems with
recorded images.
NOTES
• This camera is equipped with “flash memory” that re-
tains images even when batteries go dead and the AC
adaptor is not connected. Images can be recalled af-
ter new batteries are loaded or the AC adaptor is con-
nected.
• Note that strong direct or reflected light can cause ver-
tical lines in an image. This is due to the characteris-
tics of the camera’s charge-coupled device (CCD),
and it does not indicate malfunction.
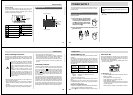
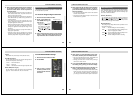
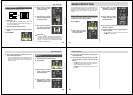
Using the Viewfinder for Recording
The illustrations below show what you see when you look
through the viewfinder to compose an image for recording.
Close Up Range Frame
This frame shows the focus range when the distance from
the lens to the subject is 1 meter (40") to infinity.
Focus range for 30cm
(11.8")
Focus range for 1m to
∞
(40" to
∞
)
Auto Focus Frame
Close Up
Range
Frame
Focus
Range
Frame