23
ADVANCED FEATURES
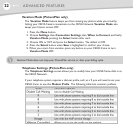
You may have to adjust the Dial Type on your CEIVA frame if your telephone system uses
Pulse Dialing. Please contact CEIVA Customer Care before adjusting the Modem State.
1. Press the Menu button.
2. Choose Settings, then Connection Settings, then Telephone Settings, pressing
the Select button after each.
3. Using the Left and Right buttons, choose a Modem Prefix and Modem State
(lower if applicable) and select a Dial Type.The defaults are None for the Modem
Prefix, 33.6 kbps for the Modem State, and Tone for the Dial Type.
4. Press the Select button when Save is highlighted to confirm your choice.
Ethernet Settings (PicturePlan only)
If you are using a broadband connection, refer to Ethernet Settings information in the manual
that came with your CEIVA Broadband adapter or at http://ceivabroadband.ceiva.com.
Wireless Settings (PicturePlan only)
If you are using a wireless network connection, refer to Wireless Settings information in the
manual that came with your CEIVA Wireless adapter or at http://ceiva
wireless.ceiva.com.
Frame Information
The Frame Info screen provides important information about your CEIVA frame, including the CEIVA
frame's serial number, the software version number, the PicturePlan expiration date, and the date the CEIVA
frame last retrieved new photos. The
Frame Info screen also displays error messages when applicable.
1. Press the Menu button.
2. Choose Settings and then Frame Info, pressing the Select button after each.


