


Transferring Data 25
P-5000 User’s Guide
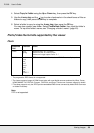
4. Follow steps 4 to 6 of “Copying particular data” (page 22).
Backing Up Data onto the Computer
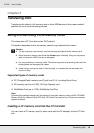
Connecting the viewer to the computer
If you connect the viewer to the computer, the viewer is recognized as an external HDD.
Before transferring, install the software. For details, see “Installing the software” (page 14).
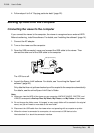
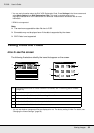
1. Connect the AC adapter.
2. Turn on the viewer and the computer.
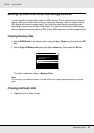
3. Open the USB connector’s cover and connect the USB cable to the viewer. Then
connect the other end of the USB cable to the computer.
The LCD turns off.
4. Launch the Epson Link2 software. For details, see “Launching the Epson Link2
software” (page 26).
Only data that has not yet been backed up will be copied to the computer automatically.
For details, see the online Epson Link2 User’s Guide.
Note:
❏ When you view the HDD of the viewer on your computer, BACKUP, MUSIC, PHOTOS, and
VIDEOS correspond to Backup Files, My Music, My Photos, and My Videos of the viewer.
❏ Do not change the folder name. If changed, a new, empty folder will be created in the original
name, and you will need to move data to the new folder.
❏ Disconnect the USB cable from the viewer when not operating with a computer or printer.
❏ When the viewer is connected to a computer, do not connect a USB device to the
Host-standard A, or touch the connector interface.
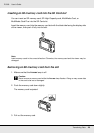
BATT.
USB (Mini-B)
USB (Standard-A)