


You can change the setting to Full if the images that you print are under exposed or over
exposed, contain dark areas or red eye, or have colors that appear washed out.
You can also select the Off setting if you prefer to edit the image manually in a software
program such as HP Photosmart software.
To change the HP Real Life technologies setting
1. Open the Printer Properties dialog box. For more information, see “
Printer Properties
dialog box” on page 23.
2. Click the Features tab.
3. In the HP Real Life technologies Photo fix drop-down list, select the appropriate
setting for the photo you are printing.
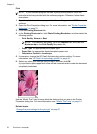
Maximum dpi
Use maximum dpi mode to print high-quality, sharp images.
To get the most benefit from maximum dpi mode, use it to print high-quality images such
as digital photographs. When you select the maximum dpi setting, the printer software
displays the optimized dots per inch (dpi) that the HP Photosmart printer will print.
Printing in maximum dpi takes longer than printing with other settings and requires a large
amount of disk space.
To print in Maximum dpi mode
1. Open the Printer Properties dialog box. For more information, see “
Printer Properties
dialog box” on page 23.
2. Click the Features tab.
3. In the Paper Type drop-down list, click More, and then select the appropriate paper
type.
4. In the Print Quality drop-down list, click Maximum dpi.
NOTE: To view the maximum dpi that the HP Photosmart printer will print, click
Resolution.
5. Select any other print settings that you want, and then click OK.
Change the print settings for the print job
This section describes how to change print settings, such as paper type or paper quality,
when printing from a computer. This section contains the following topics:
•
Change the print quality
•
Change the paper type
•
Change the paper size
•
Resize a photo
•
Use advanced color settings
•
Create printing shortcuts
Change the print settings for the print job 27