


Chapter 7: Troubleshooting and Support 129
local hard drive. For more information about how to copy
files, visit Mac help, the help system included with your
computer.
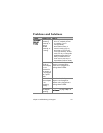
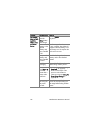
Configuring the Camera as a Disk Drive
NOTE This method may not work with Windows 98
computers.
This method sets up your camera to function as a disk drive
when it is connected to your computer.
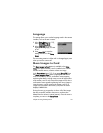
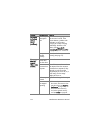
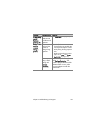
1 Set your camera to Disk Drive mode (you only need to do
this step once):
a. Turn the camera on, and then press the Menu/OK button
to display the Capture Menu.
b. Use the button to navigate to the Setup Menu.
c. Use the button to highlight the USB menu option, and
then press Menu/OK.
d. Use the button to select Disk Drive, and then press
Menu/OK.
e. Use the button to highlight EXIT, and then press
Menu/OK.
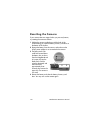
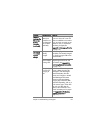
2 Once your camera is set to Disk Drive mode, connect the
camera to your computer using the USB cable
3 At this point, the process for transferring images is the same
as described in the section Using a Memory Card Reader
on page 126. On Windows computers, the camera will
appear as a Removable Disk in the Windows Explorer
screen. On Macintosh computers, either the Image Capture
or iPhoto application will launch automatically.