


36
PREPARATIONS FOR OPERATION
Setting and Displaying the Date and Time
The date and time of the built-in clock should be set. Powered
by the built-in backup battery the set date and time data con-
tinue to count even when the power is switched off.
•The set date and time data are displayed on the LCD mon-
itor or in the viewfinder and recorded on the tape in accor-
dance with the settings made on the menu screen.
Setting the Date and Time Style
The date and time are set on the menu screen.
When setting while observing on a monitor connected to the
connector, set the OUTPUT CHAR. item on the OTHERS [1/2]
menu screen to ON.
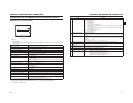
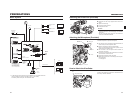
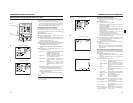
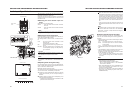
1.Set the POWER switch to ON.
2.Press the STATUS button for 1 second or longer to dis-
play the TOP MENU screen.
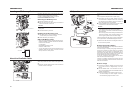
3.Rotate the SHUTTER dial to align the cursor (K) with the
TC/UB/CLOCK item, and then press the SHUTTER dial in
the direction of the camera body.
•The TC/UB/CLOCK menu screen appears.
4.Rotate the SHUTTER dial to align the cursor (K) with the
TIME/DATE item, and then press the SHUTTER dial.
•The TIME/DATE menu screen appears.
•Set the DISPLAY item on the TIME/DATE menu screen
to ON.
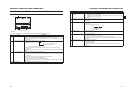
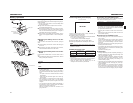
5.Make settings on the TIME/DATE menu screen. (This
includes display style, etc.)
1Rotate the SHUTTER dial to align the cursor (K) with the
item to be set, and then press the SHUTTER dial.
•The setting area of the selected item starts blinking.
2Rotate the SHUTTER dial to change the setting, and
then press the SHUTTER dial.
•The setting area stops blinking and the setting is
entered.
MEMO
The TIME STYLE, SEC DISPLAY, DATE STYLE and TIME
SHIFT items can also be set and changed after the date and
time have been set.
USER 3USER 2USER 1
STATUS
MENU
SHUTTER
2
1
OFF
ND FILTER
REC
OFF
ON
POWER
WHT.BAL
AUTO
AUDIO
LEVEL
AUTO
CH-1 CH-2
3.
1.
POWER switch
4. TC/UB/CLOCK menu screen
5. TIME/DATE menu screen
SHUTTER dial
2.
STATUS button
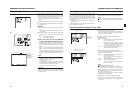
DATE STYLE : Selects the style for displaying the date.
YY/MM/DD (Year, month, day)
MM/DD/YY (Month, day, year)
DD/MM/YY (Day, month, year)
TIME STYLE : The time can be set to display as a 12-
hour or 24-hour clock system.
SEC DISPLAY : To select whether or not indication of
seconds should be displayed on the
screen.
TIME SHIFT : Adds time to the built-in clock (time
compensation) and displays it. The
adjusted time is also recorded on the
tape.
37
PREPARATIONS FOR OPERATION
Setting the Date and Time
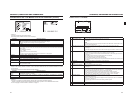
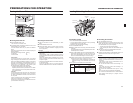
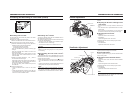
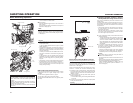
1.Display the CLOCK ADJUST menu screen.
Select the CLOCK ADJUST item on the TIME/DATE
menu screen.
2.Set the date and time.
The blinking digit is the one to be set.
1When the SHUTTER dial is pressed, the blinking digit
moves to the next digit.
2When the SHUTTER dial is rotated, the value of the
blinking digit changes.
When the SHUTTER dial is rotated upward, the value
becomes higher. When rotated downward, the value
becomes smaller.
3Repeat the procedure described in 1 and 2 above to
set the day, month, year, hours, minutes.
The digits indicating seconds cannot be set.
4Press the SHUTTER dial in sync with a time signal to
enter the date and time precisely.
3.When all the settings are completed, rotate the SHUTTER
dial to align the cursor with the PAGE BACK item, and
then press the SHUTTER dial.
•The TIME/DATE menu screen returns.
4.To return to the normal screen, use either of the following
methods.
Press the STATUS button
or
Return to the TOP MENU screen and then select the
EXIT item on the TOP MENU screen before pressing the
SHUTTER dial.
Displaying the Time and Date on the Screen
Whether or not the time and date should be displayed on the
screen and how to display them are set on the TIME/DATE
menu screen.
1.Display the TIME/DATE menu screen.
1Select the TC/UB/CLOCK item on the TOP MENU
screen.
2Select the TIME/DATE item on the TC/UB/CLOCK
menu screen.
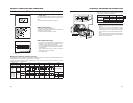
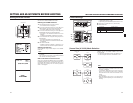
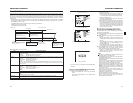
2.Set the TIME/DATE menu screen.
Display of date and time in the various operation modes.
1. TIME/DATE menu screen
2.
Date
Time (Hour:Min)
Date Time
CLOCK ADJUST menu screen
•DISPLAY item : Sets whether or not date and time
should be displayed.
Set to ON to display the indications.
•DISPLAY MODE
item
:Sets the video output mode in
which date and time should be dis-
played.
BARS : Displayed when outputting the color
bar.
CAM : Displayed when outputting the color
camera image.
BARS+CAM :
Date and time are always displayed.
•DISPLAY STYLE
item
:Sets the style in which the date and
time are displayed.
DATE+TIME : Date and time are displayed.
DATE : Date only is displayed.
TIME : Time only is displayed.
In Camera mode : The date and time of the internal
clock are displayed.
In VTR playback mode : The date and time recorded on the
tape are displayed.
In VTR stop mode : The last read date and time values
are displayed.
When an HDV/DV sig-
nal is input from the
IEEE1394 connector
:Displays the date and time of the
HDV/DV input. (GY-HD100U/GY-
HD101E only)