


40
PREPARATIONS FOR OPERATION
Presetting and Recording of Time Code (Cont’d)
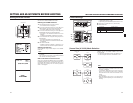
Presetting time cord data
The time code and user’s bit data are preset on the TC/UB/
CLOCK menu screen.
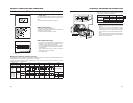
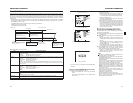
1.Display the TC/UB/CLOCK menu screen.
Select the TC/UB/CLOCK item on the TOP MENU screen.
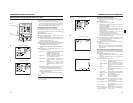
2.Set the time code (hours, minutes, seconds, frames).
1Rotate the SHUTTER dial to align the cursor (K) with TC
PRESET, and then press the SHUTTER dial.
•The first digit of the time code blinks.
The blinking digit is the one to be set.
2When the SHUTTER dial is pressed, the blinking digit
changes.
3When the SHUTTER dial is rotated, the value of the
blinking digit changes.
When the SHUTTER dial is rotated upward, the value
becomes higher. When rotated downward, the value
becomes smaller.
4Repeat the procedure described in 2 and 3 above to
set the desired value for all digits.
5After setting the frame digit, press the SHUTTER dial to
make EXECUTE blink. The setting values are confirmed
when the SHUTTER dial is pressed again.
To cancel the setting, select CANCEL and press the
SHUTTER dial.
3.When all the digits are set
•Press the STATUS button to return to the normal
screen
or
• Rotate the SHUTTER dial to align the cursor (K) with
the PAGE BACK item, and then press the SHUTTER
dial to return to the TOP MENU screen.
Presetting user’s bit data
The user’s bit data are preset with the UB PRESET item on
the TC/UB/CLOCK menu screen.
The method for setting is the same as the method for setting
the time code described above.
•The user’s bit can be specified using numerals or alpha-
betic letters from 0 to F for each digit.
•To record user’s bit data, set the UB REC item to ON.
CAUTION
It is not possible to set all the digits of the user’s bit data to
“F”.
Reading of the data during playback will not be possible for
an all-F setting.
Zero-resetting the Time Code or User’s
Bit Data
This is performed with the TC or UB PRESET item on the TC/
UB/CLOCK menu screen. (Performed separately for the time
code and the user’s bit data.)
1Rotate the SHUTTER dial to align the cursor (K
KK
K) with the
TC or UB PRESET item, and then press the SHUTTER
dial.
2Rotate the SHUTTER dial to select ZERO PRESET as the
setting value, and then press the SHUTTER dial.
MEMO
When a menu screen is not being displayed, you can zero
reset the time code data by simultaneously holding down
the USER2 button and the STOP button for about 1 second.
Time code (hour, min, sec, frame)
41
PREPARATIONS FOR OPERATION
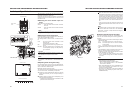
Screen Adjustment
LCD monitor direction, angle, screen brightness, etc. can be
adjusted.
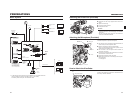
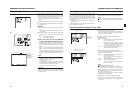
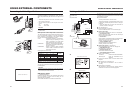
Adjusting the Direction and Angle of the
LCD monitor
•With the LCD door in the open condition, rotate the LCD
door.
•It can be turned 180° in upward direction and 90° in down-
ward direction.
When turned 180° upward direction, the LCD monitor can
be viewed from the lens side (vertically inverted image).
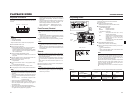
Adjusting the LCD monitor
• PEAKING:
Adjusts the contour of the LCD monitor.
•LCD BRIGHT:
Adjusts the brightness of the LCD monitor.
Adjustments are made on the LCD/VF [3/3] menu screen.
X See page 73.
•LCD CONTRAST:
Adjusts the contrast of the LCD monitor.
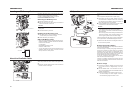
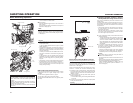
Viewfinder Adjustment
Direction of the Viewfinder
Adjust the position and angle of the viewfinder.
Diopter Adjustment
Rotate the eyepiece focusing ring until the viewfinder screen
image is clearly visible.
Adjustment of the Viewfinder Screen
• PEAKING:
Adjusts the contour of the LCD monitor and the viewfinder
screen.
•VF BRIGHT:
Adjusts the brightness of the viewfinder screen.
Adjustments are made on the LCD/VF [3/3] menu screen.
X See page 73.
•VF CONTRAST:
Adjusts the contrast of the viewfinder screen.
MEMO
The screen size of the viewfinder can be changed by select-
ing the desired size with the ASPECT item on the VIDEO
FORMAT menu screen (4:3 or 16:9).
PEAKING volume
LCD BRIGHT
button
LCD lock release lever
180° up
90° down
Eyepiece focusing ring
VF BRIGHT volume
Eyepiece
PEAKING volume
Sliding securing ring
Viewfinder mount base