


48
SHOOTING OPERATION
Basic Recording Operation
1.Set the POWER switch to ON.
•The unit turns on in camera mode.
2.Start recording.
Press the REC/VTR trigger button on the GY-HD100 to
start recording.
Once recording has started, the FRONT TALLY lamp and
BACK TALLY lamp light red.
MEMO
The way the FRONT TALLY and the BACK TALLY lamps
flash differ depending on what you set in the FRONT TALLY
and BACK TALLY items on the OTHERS [1/2] menu screen.
X See page77.
CAUTION
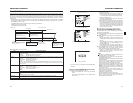
•The unit enters the stop mode automatically at TAPE END.
If this mode continues for 3 minutes, the mode switches to
the tape protect mode.
X
See “OTHERS [1/2] Menu Screen” on page 77. (LONG
PAUSE TIME item)
• If the REC/VTR trigger button is pressed very quickly and
repeatedly, or the POWER switch is moved immediately
after the trigger button is pressed, the GY-HD100 may not
enter the record mode.
To remedy this condition set the POWER switch to OFF
and wait for 5 seconds or more before turning the power
on again.
•A neat transition to the next recorded scene cannot be
guaranteed if a recording is ended by turning the POWER
switch or DC power supply OFF, or by removing the bat-
tery pack.
•Trial-shooting is always recommended before recording
important events to confirm the recording is satisfactory.
•The microphone may pick up the sound of the lens’ iris if
the iris is changed abruptly or the iris is manually moved
abruptly during recording.
About the Focus Assist Function
When you press this button during shooting, the area of focus
is displayed in blue, red or green, making it easy to focus
accurately.
X See “LCD/VF [1/3] Menu Screen” on page 71.
You can also set this function from the RET button.
X See “SWITCH MODE Menu Screen” on page 69. (LENS
RET item)
About the QUICK REC START Mode
If the REC/VTR trigger button is pressed immediately after
the videocassette is inserted, the mode becomes the
QUICK REC START mode that enables quick start of
recording.
However, when shooting starts in the middle of the tape, a
blank space appears as the new scene will not be linked
smoothly with the previous image.
Also, the time code does not continue. (Some overlap may
also occur.)
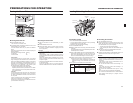
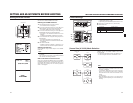
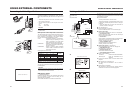
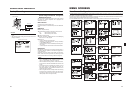
FRONT TALLY lamp
POWER switch
FOCUS ASSIST
button
REC trigger button
BACK TALLY lamp
RET
button
VTR trigger button
49
SHOOTING OPERATION
If the Record-Standby Mode Continues
Setting the time before the tape protection mode is engaged
The time before the tape protection mode is engaged from
the record-standby mode can be set to 5 minutes or 3 min-
utes with the LONG PAUSE TIME item on the OTHERS [1/2]
screen menu. X See page 77.
When the record-standby mode has continued for about 5
minutes or 3 minutes, the GY-HD100 automatically stops
drum rotation in order to protect the tape. (Tape protect mode)
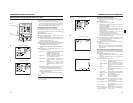
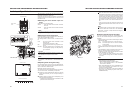
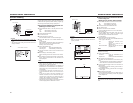
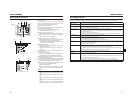
In the tape protect mode, STOP is shown as the VTR mode
indication on the LCD monitor and in the viewfinder screen.
(STATUS 1 screen)
To start recording from the tape protect mode, press the
REC/VTR trigger button.
•The drum starts rotating, and recording starts after about
3 seconds.
To return to the record-standby mode from the tape protect
mode, press the RET button.
CAUTION
This function does not work when using RET button is used
as FOCUS ASSIST button.
Checking Recorded Contents in Record-
Standby Mode (Recording Check Function)
This function is available only when the GY-HD100 is in the
standby mode.
In standby mode, about 5 seconds of the last part of the con-
tent recorded in DV format can be played back, and about 7
seconds when the content was recorded in HDV format can
be played back.
•The recorded contents can be checked on the LCD moni-
tor, in the viewfinder or on a monitor connected to the video
signal output connectors.
•The video image from the VTR section is shown on the
LCD monitor, in the viewfinder or on the monitor connected
to the video signal output connectors.
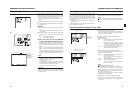
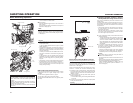
1.In the record-standby mode, press the RET button on the
camera lens section.
•The tape rewinds and about 6 seconds of the content
recorded in DV format is played back, and about 8 sec-
onds of the content recorded in HDV format is played
back. After playback, the camcorder returns to standby
mode at the position on the tape where the RET button
was pressed.
If you continue to hold down the RET button, up to about
18 seconds of content recorded in DV format and up to
about 20 seconds of content recorded in HDV format can
be rewound and played back.
•Pressing the REC/VTR trigger button during playback
will put the unit in REC standby mode. The camera will
automatically return to recording mode after playback.
CAUTION
•This function does not work when using RET button is
used as FOCUS ASSIST button.
•This function does not work when the GY-HD100 is in the
stop mode.
•During recording check, the following indication will appear
if the error rate increases due to head clogging, etc.
“HEAD CLEANING REQUIRED!” is shown on the LCD
monitor or in the viewfinder. (When the STATUS 0, 1, 4
screen is displayed.)
VTR mode indication
1. RET button