


44
Shooting
You can record audio from the two channels (CH-1/CH-2) in
synchronization with video images on this camera recorder.
The camera recorder is equipped with [INPUT1] and
[INPUT2] terminals for audio input. You can select a
recording channel and the adjustment mode (manual/
automatic).
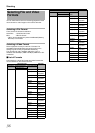
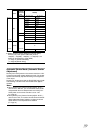
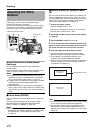
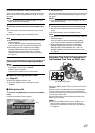
Setting Audio Input
Select the audio to input through [INPUT1] and [INPUT2]
terminals with the [AUDIO INPUT 1/2] mode switch.
Note :
●
When connecting a device that does not require a +48 V
power supply, make sure that it is not set to the
A
MIC+48V
B
position.
●
When the [AUDIO INPUT 1/2] mode switch is set to
A
MIC
B
,
make sure that a microphone is connected to the [INPUT1/
INPUT2] terminal. If you increase the recording level when a
microphone is not connected, noise from the input terminal may
be recorded.
●
When a microphone is not connected to the [INPUT1/
INPUT2] terminal, set the [AUDIO INPUT 1/2] mode switch
to
A
LINE
B
or adjust the volume with the [CH1/CH2 AUDIO
LEVEL] recording level adjustment knob.
Memo :
●
Set the reference input level of
A
MIC
B
and
A
MIC+48V
B
using
[Input1 Mic Ref.]/[Input2 Mic Ref.] in the [Main
Menu]
B
[Record Set]
B
[Audio Set] menu. (
A
Page 72)
Ⅵ
Setting of [CH-2 INPUT] Selection Switch
Use the [CH-2 INPUT] selection switch to select the audio to
be recorded to CH-2.
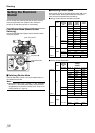
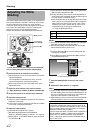
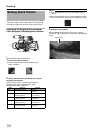
Adjusting Audio Recording Level
You can select to adjust the audio recording levels for the two
channels (CH-1/CH-2) manually or automatically.
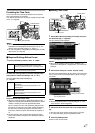
ⅥManual Adjustment Mode (Manual
Adjustment)
Set the [AUDIO SELECT CH-1/CH-2] switch on the camera
recorder to AMANUALB to enter the manual adjustment
mode, and use the [AUDIO LEVEL CH-1/CH-2] adjustment
knob to set the recording level.
You can adjust the level manually during the recording,
recording pause, and stop modes.
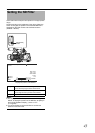
1 Set the [AUDIO SELECT CH-1/CH-2] switch to
AMANUALB for the channel to manually adjust the
recording level.
2 Turn the corresponding [AUDIO LEVEL CH-1/CH-2]
adjustment knob to adjust the level.
Adjust such that the audio level meter does not light up at -2 dB
even for loud sounds.
Memo :
●
Set [Audio Limiter] in the [Main Menu]
B
[Record Set]
B
[Audio
Set] menu to
A
On
B
to activate the audio limiter in the Manual
Adjustment Mode. This controls the recording level when
excessive audio signals are input. (
A
Page 72)
●
For the reference level to be recorded on SDHC cards, set
[Audio Ref. Level] in the [Main Menu]
B
[Record Set]
B
[Audio
Set] menu to
A
-20dB
B
or
A
-12dB
B
. (common for CH-1, CH-2)
(
A
Page 72)
Adjusting Audio Input
Settings and Recording
Level
[LINE]
Use this setting when connecting to an audio device or
other equipment. The reference input level is +4 dBu.
[MIC] Use this setting when connecting to a dynamic
microphone.
[MIC+48V]
Use this setting when connecting to a microphone
(phantom microphone) that requires a +48 V power
supply.
[INPUT1] Records audio from [INPUT1] terminal to CH-2.
[INPUT2] Records audio from [INPUT2] terminal to CH-2.
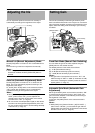
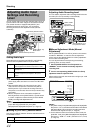
[AUDIO INPUT 1/2]
Mode Switch
[INPUT1/INPUT2] Terminal
[CH-2 INPUT] Selection Switch
[AUDIO LEVEL
CH-1/CH-2]
Adjustment Knob
[AUDIO SELECT CH-1/
CH-2] Selection Switch
When the LCD monitor is open
[FULL AUTO] Switch
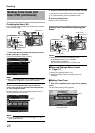
00:00:00:00
MAX 123%
MIN 45%
SKIN AREA
S.DTL
B -3
ND1/16 A<3200K>
F5.6 AE+1 9dB 1/10000
STBY
100min
100min
1280x720
24p HQ
B
A
282min
30/24 fps
Audio Level Meter
STATUS 1 Screen
-2 dB