


22 EN
P
L
A
Y
OFF
CAMERA MENU
CAMERA
P I CTURE MODE
SYSTEM
EX I T
CAMERA
EXPOSURE 0
M .W. B . AUTO
SHUTTER
EX I T
SPEED UTOA
M .W. B .
AUTO
MW
B
EX I T
MANUAL SHOOTING
(cont.)
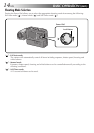
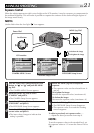
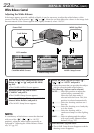
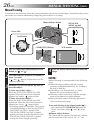
White Balance Control
Adjusting the White Balance
If the image appears greenish, reddish or bluish, it may be necessary to adjust the white balance of the
camera. From the list of presets (“ ”, “ ” or “ ”), select the one that makes the colours in the image look
the most natural. If the colours appear only slightly unnatural, select “AUTO”.
1
Turn the Power Dial, while pressing its Lock
Button, to “
M
” or “ ” and push the MENU
Jog Dial.
•The CAMERA MENU Screen appears.
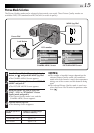
2
Rotate the MENU Jog Dial to select
“CAMERA” and push it.
•The CAMERA Setup Screen appears.
3
Rotate the MENU Jog Dial to select “M.W.B.”
(Manual White Balance) and push it.
•The M.W.B. Setup Screen appears.
MENU Jog DialPower Dial
LCD monitor
CAMERA MENU Screen
CAMERA Setup Screen
M.W.B. Setup Screen
Lock Button
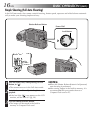
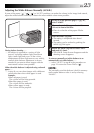
4
Rotate the MENU Jog Dial to select “ ”,
“ ”, “ ” or “AUTO” and push it.
•Select the preset that can provide the subject
with the most desirable white balance.
The following 5 options can be selected.
AUTO ......Select this position to adjust the
colour balance automatically.
When the Full Auto mode is
selected with the Power Dial, this
position is selected automatically.
............Select for shooting outdoors on a
fine day.
...........Select for shooting on a cloudy day
or in the shade.
.............Select for shooting with in-
candescent lamps or video lighting,
etc.
MWB .......Select to photograph the subject
with a previously adjusted colour
balance (੬ pg. 23).
5
Push the MENU Jog Dial twice.
•The M.W.B. Setup Screen disappears and the
shooting screen reappears.
NOTE:
If a satisfactory white balance cannot be obtained
with any of the “ ”, “ ”, “ ” or “AUTO”
positions, adjust the white balance manually as
indicated in “Adjusting the White Balance Manu-
ally” (
੬
pg. 23).