


DSD/00001/7194.5
7
30. No further action is required.
Year 2000 Test Procedure:
Use the following steps to test the change to the year 2000 and then reset to the current date.
The following items are required to perform this procedure on the Reply/AU560.
Program Floppy Disk 1/3
MU5907 SPECIAL TOOL for YEAR 2000 diskette
31. Confirm that POWER ON switch on the front of the DPR is not illuminated and the analyzer
and DPR are off.
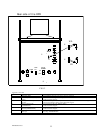
32. Move the BOOT switch on the rear side of the DPR from “WD” to “FD”. When moving the
switch, please pull out on the switch. If the switch is not pulled, it cannot be moved (FIG.12-
¬-).
33. Switch ON the LOCAL POWER switch on the rear side of the DPR (FIG.12-¯). Wait until
the DPR displays the message ”Please insert system floppy disk & hit any key then restart disk
mount”.
34. Confirm that Write Protect is off on the Program Floppy Disk 1/3, insert it into the FD drive
and press the Enter ↵ key.
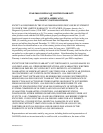
35. Wait until the DPR displays the (FIG.1) menu.
36. Type 7 and the Enter ↵ key on the keyboard.
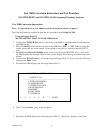
37. Wait until the DPR displays the (FIG.2) menu. Only Item 1 displays at this time.
38. Type S and the Enter ↵ key, B and the Enter ↵ key and M and the Enter ↵ key on the
keyboard. Items 2 through 5 will now be displayed on the (FIG.2) menu.
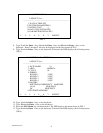
39. Type 2 and the Enter ↵ key on the keyboard. Wait until the DPR displays the (FIG.3) menu.
40. Type 1 and the Enter ↵ key on the keyboard.
41. Type 20 and the Enter ↵ key on the keyboard.
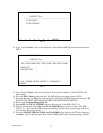
42. Press the Menu key. The DPR displays the menu shown in FIG.2.
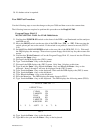
43. Type 1 and the Enter ↵ key on the keyboard. The DPR displays the following menu (FIG.9).
*** DATE & TIME SET ***
# SELECT No.>
---------------------------------------------------------------------
1 YEAR XX
2 MONTH XX
3 DAY XX
4 HOUR XX
5 MINUTE XX
6 SECOND XX
1: 2: 3: 4:SET 5: 6: 7: 8:
FIG.9
44. Type 1 and the Enter ↵ key on the keyboard.
45. Type 00 for the year and the Enter ↵ key on the keyboard.