


DSD/00001/7194.5
8
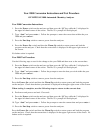
46. Type 2 and the Enter ↵ key on the keyboard.
47. Type 01 for the month and the Enter ↵ key on the keyboard.
48. Type 3 and the Enter ↵ key on the keyboard.
49. Type 01 for the day and the Enter ↵ key on the keyboard.
50. Press F4 (Set) to set the date and time. The date and time displayed in the upper right hand
corner of the screen will reflect your changes.
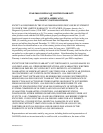
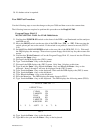
51. Press the OPS Menu key on the keyboard. The DPR displays the menu shown in FIG.1.
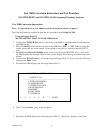
52. Type 6 and the Enter ↵ key on the keyboard. Wait until the DPR displays the (FIG.4) menu.
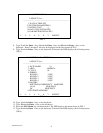
53. Type 1 and the Enter ↵ key on the keyboard. Wait until the DPR displays the (FIG.5) menu.
54. Type 2 and the Enter ↵ key on the keyboard. Wait until file number 2 (M510SYS.FIL) has
been copied.
55. Press the OPS. Menu on the keyboard. The DPR displays the menu shown in FIG.1.
56. Press the function key F8 (Exit) on the keyboard. Wait until the DPR displays the message ”BE
SURE TO SET BOOT SWITCH ON WD SIDE AND PRESS RESET SWITCH”.
57. Remove the Program Floppy Disk 1/3.
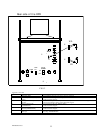
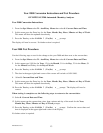
58. Switch OFF the LOCAL POWER switch on the rear side of the DPR (FIG12- ¯).
59. Wait 10 seconds and switch ON the LOCAL POWER button on the rear side of the DPR
(FIG12- ¯). Wait until the DPR displays the message ”Please insert system floppy disk & hit
any key then restart disk mount”.
60. Insert the MU5907 SPECIAL TOOL for YEAR 2000 floppy disk into the FD drive and press
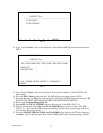
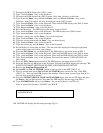
the Enter ↵ key on the keyboard. Wait until the DPR displays the message from FIG.6.
61. Type GO2000 and press the Enter ↵ key on the keyboard. (see FIG.7)
62. Wait until the DPR displays the message from Fig.8.
Note: If any errors are displayed during steps 60 to 62, refer to the Appendix Error List.
63. Remove the MU5907 SPECIAL TOOL for YEAR 2000 floppy disk.
64. Move the BOOT switch on the rear side of the DPR from “FD” to “WD”. When moving the
switch, please pull out on the switch. If the switch is not pulled, it cannot be moved (FIG.12-
¨).
65. Switch OFF the LOCAL POWER button on the rear side of the DPR (FIG12- ¯).
66. Power on the equipment using the POWER ON switch on the front of the DPR.
67. Execute preparation check after program loading completes. The Start Condition menu is
displayed.
68. In the Start Condition menu, check the following:
a. Check that the date and time displayed on the top right of the screen is correct.
b. Execute data index change entering = for date. Check that the date of the new index
indicates the correct date.
Note: Measurement done in the current index with the year set to 2000 will remain on the hard
drive and may cause some confusion.
When testing is complete use the following steps to return to the current date.
69. Perform an End Process on the instrument.
70. Move the BOOT switch on the rear side of the DPR from “WD” to “FD”. When moving the
switch, please pull out on the switch. If the switch is not pulled, it cannot be moved (FIG.12-
¬-).
71. Switch ON the LOCAL POWER switch on the rear side of the DPR (FIG.12-¯). Wait until
the DPR displays the message ”Please insert system floppy disk & hit any key then restart disk
mount”.
72. Confirm that Write Protect is off on the Program Floppy Disk 1/3, insert it into the FD drive
and press the Enter ↵ key.