


2. Press the “+” button or “–“ button on the Remote Control to select or unselect
the highlighted photo. Selected photos will have a check in the thumbnail
photo window.
3. Press the SETUP button. A setup menu opens.
4. Press the Up or Down arrow to choose Delete Photo and press ENTER. Two
submenu options will be provided: Delete Selected or Delete All. Choose
Delete Selected to delete the marked photos or choose Delete All to delete
all photos.
Caution: You will not be asked to confirm or have a chance to change your mind.
It is a good idea to keep copies of the photos you copy onto your Digital Photo
Frame.
5. Press EXIT to close the menu.
Use the PantTouch Menu to delete photos from the internal memory.
1. Go to the Photo Thumbnails screen.
2. Use the Arrow Buttons to highlight the photo you want to delete.
3. Press the SELECT button on the highlighted photo.
4. Press the DELETE SEL button to delete selected photos, or press the
DELETE ALL button to delete all photos in built-in memory. Once the
deletion is complete, a “Finished!” message display in the middle of the
screen.
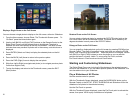
Bluetooth Setting
Bluetooth USB Dongle Required. USB Bluetooth Dongle Support connectivity to
popular mobile phones; e.g.: BlackBerry, Motorola, Nokia, SonyEricssson and others.
Note: Models may vary; please ensure the phone supports transmitting Photo to
devices like DPF.
Step 1: Setting up your Bluetooth Personal Area Network (PAN) after insert
USB Bluetooth Dongle into the DPF.
a. Insert to the USB host port and then turn on the DPF. Please check
Pandigital’s website for the comparable USB Bluetooth adapters.
http://www.pandigital.net
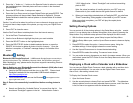
b. From Home screen, you can see the Bluetooth
icon appears on the
upper right hand corner.
Step 2: Ensure the connectivity is established before sending photos to
DPF.
a. Search and Select the “Available Device” to connect from the list. You
should see “Pandigital” appears in the list. Authentication Code is
“1234” default value. Select “Pandigital” and continue transmitting
photo to DPF.
Note: the actual procedure of sending photo to your DPF may vary.
Please refer to your mobile device user guide manual for details.
b. When you transmitting selected photo to Pandigital DPF, you shell see
“Photo Transmitting” dialog appear in the middle of your DPF screen.
When copy photo completes, your DPF will play the copied photo
immediately after.
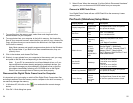
Setting Viewing Options
You can control all of the viewing options in the Setup Menu using the remote
control. You can display the on-screen Setup Menu at any time by pressing the
Setup button. Only available setup options will be displayed for each screen.
1. With the Home screen opens, press Setup to open the Setup Menu.
2. With the Setup Menu open, use the Up and Down arrows to choose a display
option.
3. Press ENTER to select the option. A second menu opens, listing the
available settings. A blue highlight shows the current setting.
4. Use the Up and Down arrows to choose the desired setting.
5. Press ENTER to select the setting. The second menu closes.
6. You can make as many changes as you wish in the same manner. When you
are finished, press the EXIT button to close the Setup Menu and return to the
previous screen.
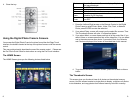
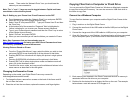
Displaying a Clock with a Calendar and a Slideshow
You can use your Digital Photo Frame as a desk calendar with a real-time clock
and continuous slideshow. You can also use the Digital Photo Frame as an
Alarm Clock, after setting internal clock.
To Display the Calendar/Clock screen:
1. Open the Home Screen.
2. Use the arrow buttons to choose Clock and press ENTER. The slideshow
displays photos from the currently selected memory source, and if the alarm
is set, on alarm icon appears under the slideshow window.
18 19