


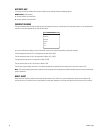


C3463M (10/09) 53
7. If FIXED DATE was selected, the following information appears:
a. Use the joystick to position the cursor beside TIME SHIFT. Press Iris Open. Scroll through the options until the desired selection
appears. Press Iris Open to select the time shift.
b. Use the joystick to position the cursor beside the start date MONTH. Press Iris Open. Scroll through the options until the desired
month appears. Press Iris Open to select the month.
c. Use the joystick to position the cursor beside the start date DAY. Press Iris Open. Scroll through the options until the desired date
appears. Press Iris Open to select the day.
d. Use the joystick to position the cursor beside START TIME. Press Iris Open. Scroll through the hours until the desired time appears.
Use the joystick to move the cursor to the right. Scroll through the minutes until the desired time appears. Press Iris Open to select the
start time.
e. Repeat steps b through d for the ending date and time.
8. If RELATIVE DATE was selected, the following information appears:
Follow the instructions in step 7 for FIXED DATE, adding WEEK.
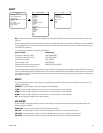
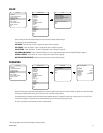
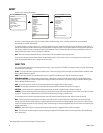
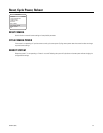
CLOCK
TIME BASE INTERNAL CLOCK
TIME FORMAT 12 HOUR
SET TIME 00:00 AM
DATE FORMAT MM/DD/YYYY
SET DATE 00/00/0000
DAYLIGHT SAVINGS FIXED DATE
TIME SHIFT 1 HOUR
START DATE
MONTH APRIL
DAY 1
START TIME 02:00 AM
END DATE
MONTH OCTOBER
DAY 1
END TIME 02:00 AM
BACK
EXIT
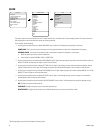
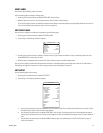
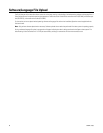
CLOCK
TIME BASE INTERNAL CLOCK
TIME FORMAT 12 HOUR
SET TIME 00:00 AM
DATE FORMAT MM/DD/YYYY
SET DATE 00/00/0000
DAYLIGHT SAVINGS RELATIVE DATE
TIME SHIFT 1 HOUR
START DATE
MONTH APRIL
WEEK 1ST
DAY SUNDAY
START TIME 02:00 AM
END DATE
MONTH OCTOBER
WEEK LAST
DAY SUNDAY
END TIME 02:00 AM
BACK
EXIT