


C2601M-C (3/07) 21
4. From a remote computer that is connected to the DX4000 through a network connection, locate the upgrade files. These files can be located
on the resource CD or on a network drive. The names of these files might be different for each upgrade. The following file names are
examples of what you should find:
• FirmwareUpgradeUtility.exe: This is the upgrade program that contains the software version number that you will install. The actual
file name might be different.
• DX4000_1.3.img: This is the firmware update file that will be copied to the DX4000 and that will overwrite the current firmware.
• DX4000RemoteAgent.exe: This is the installation program for the revised remote agent that you must install to communicate with
the upgraded DX4000. The actual file name might be different. For instructions on updating the remote agent software, refer to
Installing and Updating the Remote Agent Application on page 28.
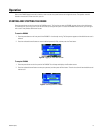
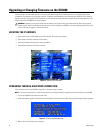
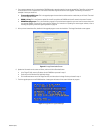
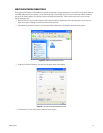
5. After you have located these files, double-click the upgrade program to start the installation. The Image Downloader screen appears.
Figure 16. Image Downloader Screen
6. Update the information on the screen as follows, and then click the Download button.
• In the Target IP field, enter the IP address for the DX4000 that you noted in step 3.
• Check the box for Download Only Application Image.
• Click the Browse button next to the Image Path field, and then select the image file that you located in step 4.
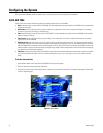
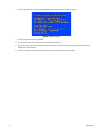
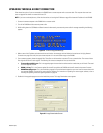
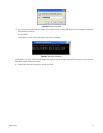
7. Track the upgrade process on the DX4000 monitor. A message at the bottom of the screen indicates the progress.
Figure 17. Upgrade In Progress Message