


C2953M-A (5/09) 53
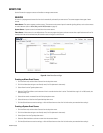
Creating an Open/Close Relay Event Handler
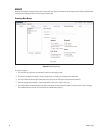
1. Click the Events tab, and then select Handlers from the drop-down menu.
2. Click in the Name box and type a user-friendly name (2 to 23 alphanumeric characters).
3. Select Open/Close Relay in the Type drop-down menu.
4. Move the On Time slider to set the amount of time that the relay will remain open. The time range is 0.1 to 200 seconds; the default setting
is 0.1.
5. Move the Off Time slider to set the amount of time that the relay will remain closed. The time range is 0.1 to 200 seconds; the default
setting is 0.1.
6. Click in the Pulse Count box and type a number.
7. If you do not want the handler activated every time an event occurs, set filters for the handler (refer to Example Handler Filter Setup on
page 53).
a. Select the day(s) of the week on which you want the relay opened/closed.
b. Type times in the Start and End boxes for the days you have selected. Use time values in 24-hour notation (for example, use 0800 for
8:00 a.m., 1600 for 4:00 p.m.).
8. Select one or more event sources to open/close the relay when those event sources are activated.
9. Click the Submit button to save the settings, or click the Reset button to clear all of the information you entered without saving it.
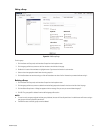
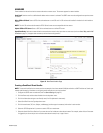
Editing an Event Handler
1. Click the Events tab, and then select Handlers from the drop-down menu.
2. Click the handler profile that you want to delete from the defined handler box located on the left side of the page.
3. Make any necessary changes to the available fields.
4. Click the Submit button to save the settings, or click the Reset button to clear all of the information you entered without saving it.
Deleting an Event Handlers
1. Click the Events tab, and then select Handlers from the drop-down menu.
2. Click the handler profile that you want to delete from the defined handler box located on the left side of the page.
3. Click the Delete Handler button. A dialog box appears with the message “Are you sure you want to delete the handler?”
4. Click OK. The handler profile is deleted from the defined handler box.
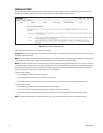
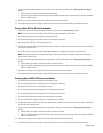
Example Handler Filter Setup
If you do not want a handler activated every time an event occurs, use the filter fields to limit handlers. For example, you only want a handler
activated when an event occurs after business hours. Your business is open Monday through Saturday, 8:00 a.m. to 6:00 p.m., and it is closed on
Sunday.
1. Create a handler for Monday through Saturday:
a. Select the day filter fields Monday through Saturday.
b. Type 0000 in the Start box and 0800 in the End box.
c. Click the plus (+) button to add another time range. Type 1800 in the second Start box and type 2400 in the second End box.
d. Select the source(s) that activates the handler.
e. Click the Submit button to save the handler.
2. Create a second handler for Sunday:
a. Select Sunday from the day filter fields.
b. Do not set a Start time or End time, as this is a 24-hour event.
c. Select the source(s) that activates the handler.
d. Click the Submit button to save the second handler.