


− 36 −
[1]
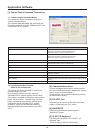
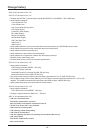
Camera Control Command Transmission
1-1 Control using the Command Button
The camera unit can be controlled by clicking the
various command buttons.
The command data transmitted and received by the
PC can be confirmed using the “SENDING DATA” and
“RECEIVING DATA” windows.
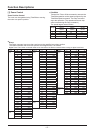
Application Software
Command Button Operation
Zoom (TELE/WIDE) Controls the ZOOM function.
Press down the button to start the ZOOM function.
Release the button to stop the ZOOM function.
Focus (FAR/NEAR) Controls the FOCUS function.
Press down the button to start the FOCUS function.
Release the button to stop the FOCUS function.
Focus (Auto/Manual/1PushAF) Selects the FOCUS function mode.
Shutter Speed (Shutter Speed) (−/OFF/+) Selects the shutter speed function mode.
Click the OFF button to return to initial settings.
Iris (Auto/Manual EI OFF/Manual EI ON) Selects the iris function mode.
Iris (Level−/Level+) Selects the iris level.
White Balance (Auto/Manual/1 push/3200K/5600K/FLUO) Selects the white balance mode.
White Balance (R−/R+/B−/B+) Use the color R and B levels to adjust the white balance according to
lightening conditions.
BLC (OFF/MULT/CENT/MASK) Selects the BLC mode.
AGC (ON/OFF) Selects the AGC mode. (AGC OFF is invalid when Day/Night is set to
AUTO.)
Version Displays the version of the connected camera.
1-2 Input Command Data Controls
(Refer to the command list)
The camera unit can be controlled by entering the
command data into the PC.
Enter a specific protocol in the box within the
“SENDING DATA” window (starting from box No.0).
The camera is operated by clicking the “Manual Send”
button. Similar to Item 1-1 (control using command
button), the data received from the camera can be
confirmed in the “RECEIVING DATA” window.
In addition, display can be switched between a
decimal/hexadecimal number display using “DEC”,
“HEX”.
[2] Communications Error
An error message displays when a communications
error occurs and communication between the camera
and PC stops for several seconds.
Communication can be stopped manually by clicking
the “Manual Stop” button.
[3] RS-232C Port
Select the port to connect the RS-232C cable from
COM1 to COM4 using the “Port” button
[4] BAUDRATE
Select the communication speed using the
“BAUDRATE” button.
[5] ID SET, ID Keyboard
The camera ID can be set in the “ID SET”, “ID
Keyboard” tabs.
(Does not apply to MD-300, 400 models)