


Useful Features
Useful features
Camera Recording
29
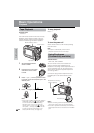
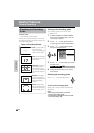
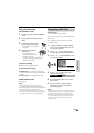
AUDIO
AUDIO MODE
ZOOM MIC
W
IND
RETURN
SET
OFF
AUTO
TELE
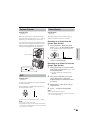
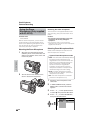
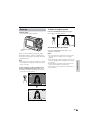
Removing the zoom microphone
Turn the screw in the opposite direction than
when mounting, then pull off the zoom micro-
phone.
Cautions:
• Do not pick up the camcorder by the zoom
microphone, as this may damage the
equipment.
• The accessory shoe on the camcorder is
designed only for use with the zoom microphone
supplied with VL-NZ10.
Using the Zoom
Microphone (Only supplied
with VL-NZ10)
Available mode:
TAPE-CAMERA
With the zoom microphone, you can record
audio according to the magnification of the
zoom lens for producing the optimum sound.
You can also set the zoom microphone to
record only sounds at a distance.
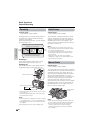
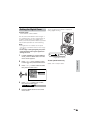
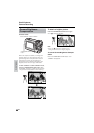
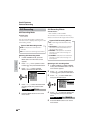
Mounting the Zoom Microphone
1 Align the zoom microphone with the
accessory shoe on the camcorder, and
slide it in the direction of the arrow until
it locks into place.
2 Turn the screw in the direction of the
arrow to secure the microphone.
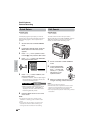
Selecting Zoom Microphone Mode
Select a Zoom Microphone mode when the
zoom microphone is mounted.
Types of Zoom Microphone modes
AUTO: The camcorder automatically selects
the optimum sound according to the
magnification of the zoom lens. When the
zoom lens is at a wide-angle setting, the
built-in microphone is used to record
sounds. As the zoom magnification
increases, the sounds from the zoom
microphone and built-in microphone are
mixed according to the zoom setting.
TELE: The zoom microphone is fixed to
record sounds at a distance. (The built-in
microphone is turned off.)
OFF: The zoom microphone is turned off.
(The built-in microphone is on.)
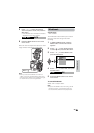
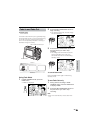
1 Mount the zoom microphone to the
camcorder.
2 In TAPE-CAMERA mode, press the
MENU button until the menu screen
appears.
3 Press l or m on the operation button
to select U, then press the SET button.
4 Press l or m to select “ZOOM MIC”,
then press the SET button.