


83
Performing with a computer
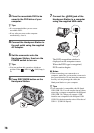
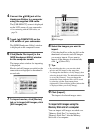
4 Connect the (USB) jack of the
Handycam Station to a computer
using the supplied USB cable.
The [USB SELECT] screen is displayed
on the LCD screen of your camcorder.
• For connecting with the USB cable, see
page 78.
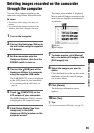
5 Touch [ COMPUTER] on the
LCD screen of your camcorder.
The [HDD Handycam Utility] window
is displayed on the computer screen.
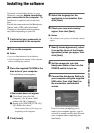
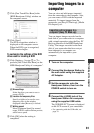
6 Click [Media File Import] in the
[HDD Handycam Utility] window
on the computer screen.
The image select window for importing
is displayed.
Movies and still images recorded on the
camcorder are displayed as thumbnails
on each tab.
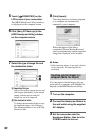
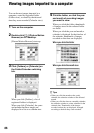
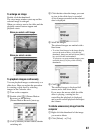
7 To import movies, click [Movies]
tab, or to import still images, click
[Still images] tab.
AMovies
BStill images
8 Select the images you want to
import.
Click the check box at the top left on the
thumbnails of movies and still images
you want to import. If you want to
import all the images on selected tab,
click [ ] (Select All).
z Tips
• By switching the tabs, you can select both
movies and still images at the same time.
• To change the destination, click [Change], then
select the desired folder. The default destination
is set as [My Pictures]. You can change the
destination where imported files will be saved
by selecting a folder from among those
registered as [Viewed folder] in the window that
is displayed when you click [Change].
9 Click [Import].
The import of selected images starts.
To import still images using the
Memory Stick slot of a computer
You can import still images recorded on a
“Memory Stick Duo” by inserting the
“Memory Stick Duo” into the Memory
Stick slot of a computer.