


108
Dubbing only desired scenes
– Digital program editing
(on tapes)
Step 3: Adjusting the
synchronization of the
VCR
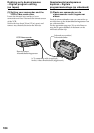
You can adjust the synchronization of your
camcorder and the VCR. Have a pen and paper
ready for notes. Before operation, eject the
cassette from your camcorder if inserted.
(1) Set the POWER switch to PLAYER on your
camcorder.
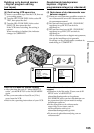
(2) Insert a blank tape (or a tape you want to
record over) into the VCR, then set to
recording pause.
When you select i.LINK in CONTROL, you
do not need to set to recording pause.
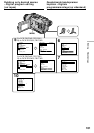
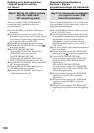
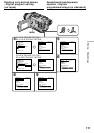
(3) Turn the SEL/PUSH EXEC dial to select
ADJ TEST, then press the dial.
(4) Turn the SEL/PUSH EXEC dial to select
EXECUTE, then press the dial.
IN and OUT are recorded on an image for
five times each to calculate the number
values for adjusting the synchronization.
The EXECUTING indicator flashes on the
screen.
When finished, the indicator changes to
COMPLETE.
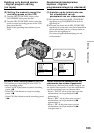
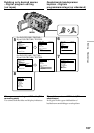
(5) Rewind the tape in the VCR, then start slow
playback.
Take a note of the first number value of each
IN and the last number value of each OUT.
(6) Calculate the average of all the first number
values of each IN, and the average of all the
last number values of each OUT.
(7) Turn the SEL/PUSH EXEC dial to select
“CUT-IN”, then press the dial.
(8) Turn the SEL/PUSH EXEC dial to select the
average number value of IN, then press the
dial.
The calculated start position for recording is
set.
(9) Turn the SEL/PUSH EXEC dial to select
“CUT-OUT”, then press the dial.
(10) Turn the SEL/PUSH EXEC dial to select the
average number value of OUT, then press
the dial.
The calculated stop position for recording is
set.
(11) Turn the SEL/PUSH EXEC dial to select
RETURN, then press the dial.
Geselecteerde bandopnamen
kopiëren – Digitale
programmamontage (op videoband)
Stap 3: Zorgen dat uw camcorder
en de videorecorder
synchroon lopen
Volgens de onderstaande aanwijzingen kunt u
zorgen dat uw camcorder en de videorecorder
synchroon lopen. Houd een pen en papier bij de
hand voor notities. Alvorens deze instelling te
maken, verwijdert u de cassette uit uw
camcorder.
(1) Zet de POWER schakelaar van de camcorder
in de “PLAYER” stand.
(2) Plaats een voor opnemen geschikte cassette
in de videorecorder en zet de videorecorder
in de opnamepauzestand.
Als u bij CONTROL hebt ingesteld op
i.LINK, is de keuze van de
opnamepauzestand niet nodig.
(3) Stel met een draai aan de SEL/PUSH EXEC
regelknop in op ADJ TEST en druk de
regelknop in.
(4) Stel met een draai aan de SEL/PUSH EXEC
regelknop in op EXECUTE en druk de
regelknop in.
Er wordt nu vijfmaal een opname gestart
(IN) en gestopt (OUT), om precies de
numerieke waarde te berekenen voor het
synchroniseren van de camcorder en de
videorecorder.
De aanduiding “EXECUTING” knippert op
het scherm.
Na afloop van de proefopnamen verandert
de aanduiding in “COMPLETE”.
(5) Spoel de band in de videorecorder terug
naar het beginpunt en start van daar af de
vertraagde weergave.
Noteer telkens de beginwaarde bij elk IN
startpunt en de laatste waarde bij elk OUT
eindpunt.
(6) Bereken het gemiddelde van alle IN
waarden en het gemiddelde van alle OUT
waarden.
(7) Stel met een draai aan de SEL/PUSH EXEC
regelknop in op “CUT-IN” en druk de
regelknop in.
(8) Kies met een draai aan de SEL/PUSH EXEC
regelknop de berekende gemiddelde waarde
voor IN en druk de regelknop in.
Hiermee is het beginpunt voor de opname
vastgesteld.
(9) Stel met een draai aan de SEL/PUSH EXEC
regelknop in op “CUT-OUT” en druk de
regelknop in.
(10) Kies met een draai aan de SEL/PUSH EXEC
regelknop de berekende gemiddelde waarde
voor OUT en druk de regelknop in.
Hiermee is het eindpunt voor de opname
vastgesteld.
(11) Stel met een draai aan de SEL/PUSH EXEC
regelknop in op RETURN en druk de
regelknop in.