


90
Adjustments and Settings from Menus
Chapter 5 Menu Displays and Detailed Settings
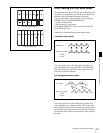
5-3-7 Selecting the Lens File
The LENS FILE page of the USER menu allows you to
change the lens file according to the lens in use.
Proceed as follows:
1
Set the MENU ON/OFF switch to ON.
The last accessed menu page appears on the
viewfinder screen.
2
Turn the MENU knob until the LENS FILE page
appears, then press the MENU knob to select the page.
The LENS FILE page shows the lens name and the f-
stop (iris setting) of the lens file currently selected.
3
Turn the MENU knob to move the b mark to LENS
FILE SELECT, and press the MENU knob.
The
b mark changes to a z mark, and the z mark
changes to a ? mark.
4
Turn the MENU knob until the lens file No. in use
appears, then press the MENU knob.
The z mark returns to a
b mark, and the ? mark
returns to a z mark.
If you do not want to use a lens file
Select OFF.
5
To end the menu operation, set the MENU ON/OFF
switch to OFF or close the cover of the menu operating
section.
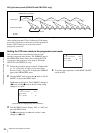
5-3-8 Selecting the Aspect Ratio
The FORMAT page of the OPERATION menu allows you
to select the aspect ratio of the video output signal.
Proceed as follows:
1
Follow the procedure of steps 1 to 3 described in
“5-3-4 Specifying an Offset for the Auto White
Balance Setting” on page 86 to display the FORMAT
page of the OPERATION menu.
(“UC/J SELECT” is displayed only for the DVW-970.)
2
Turn the MENU knob to move the b mark to “16:9/4:3
SELECT,” and press MENU knob.
The
b mark on the left of the selected item changes to
a z mark, and the z mark on the left of the setting
changes to a ? mark.
3
Turn the MENU knob to display the desired aspect
ratio, and press the MENU knob.
The z mark returns to a
b mark, and the ? mark
returns to a z mark.
4
To end the menu operation, set the MENU ON/OFF
switch to OFF or close the cover of the menu operating
section.
To display the aspect ratio of 16:9/4:3 on the
viewfinder screen
By setting the “DISP 16:9/4:3 ID” item on the VF DISP 2
page of the USER menu to “ON,” “16:9” or “4:3” appears
on the viewfinder screen according to the setting on the
FORMAT page.
For details, see “5-2-2 Selecting the Display Items” on
page 76.
To display “16:9” in color bars
By setting the “SHOT 16:9 ID” on the SHOT DISP page
of the USER menu to ON, you can record a “16:9” mode
indicator superimposed on the color bars.
For details, see “5-2-6 Recording Shot Data Superimposed
on the Color Bars” on page 79.
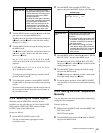
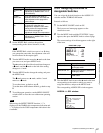
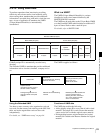
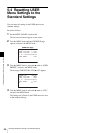
U15
19 FORMAT
16:9/4:3 SELECT : 16:9
SCAN MODE : I
UC/J SELECT : UC