


104
Saving and Loading Scene Files
Chapter 6 Saving and Loading User Setting Data
3
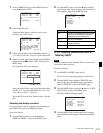
Turn the MENU knob to move the b mark to “5FILE
SAVE B MEM1-5,” and press the MENU knob.
The message “SAVE OK? YES
b NO” appears.
4
To carry out the save, move the b mark to “YES” and
press the MENU knob.
To cancel, press the MENU knob leaving the
b mark
pointing to “NO.”
When the save is completed, the message
“COMPLETE” appears.
5
To end the menu operation, set the MENU ON/OFF
switch to OFF.
If files have been saved in the page selected in step 2, those
files are replaced with files loaded from the camcorder
memory. For example, files from 001 to 005 are replaced.
Setting the file ID
Before the data is saved as a scene file, it is useful to set a
file ID to identify it. The set file ID is saved together with
the data.
To set the file ID, proceed as follows:
1
On the SCENE FILE page, turn the MENU knob to
move the
b mark to “F. ID.”
2
Press the MENU knob.
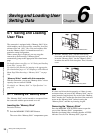
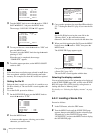
A character table appears, allowing you to select
characters you want to enter.
3
Carry out the operations for steps 4 and 5 described in
5-2-7 “Setting the Shot ID” (page 81) to enter the file
ID.
Set the file ID before saving the scene file in the
“Memory Stick” or the camcorder memory.
Otherwise, the file ID is not saved with the other data.
4
When you finish entering the file ID, turn the MENU
knob to move the x mark to “END,” then press the
MENU knob.
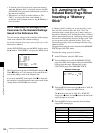
The SCENE FILE page appears again.
Carry out the procedure from step 3 in 6-2-1 “Saving
a Scene File” (page 102).
The set file ID is saved together with the data.
Selecting the display contents
You can select the items of file information to be displayed
on the SCENE STORE pages (P01 to P20) or the SCENE
RECALL pages (P01 to P20) used for saving data to or
loading data from a “Memory Stick.”
For details, see “Selecting the display contents” on page
101.
6-2-2 Loading a Scene File
Proceed as follows:
1
In the TOP menu, select the FILE menu.
2
Turn the MENU knob until the SCENE FILE page
appears, then press the MENU knob to select the page.
Alternatively, on the CONTENTS page select
“SCENE FILE,” and press the MENU knob to display
the SCENE FILE page.
Note
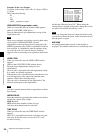
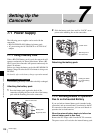
P01 SCENE STORE
DISPLAY MODE : ALL
001.SCENE1 FEB/05/02
002.SCENE2 FEB/06/02
003.NO FILE
004.SCENE4 FEB/08/02
005.SCENE5 FEB/08/02
***.5FILE SAVE MEM1-5
ESC
P01 SCENE STORE
SAVE OK? YES NO
DISPLAY MODE : ALL
001.SCENE1
002.SCENE2
003.NO FILE
004.SCENE4
005.SCENE5
***.5FILE SAVE MEM1-5
ESC
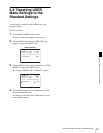
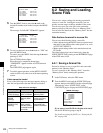
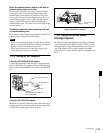
F04 SCENE FILE
s
1 :STANDARD
s
2 :STANDARD
s
3 :STANDARD
s
4 :STANDARD
s
5 :STANDARD
s
STANDARD
SCENE RECALL : EXEC
SCENE STORE : EXEC
F.ID:
TOP
Note
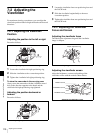
F04 SCENE FILE
!#$%&'()*+,-./012345678
9:;<=>?@ABCDEFGHIJKLMNOP
QRSTUVWXYZ[Y]abcdefghijk
lmnopqrstuvwxyz~
INS DEL RET ESC END
s
STANDARD
SCENE RECALL : EXEC
SCENE STORE : EXEC
F.ID:
x
TOP
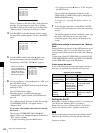
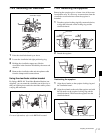
F04 SCENE FILE
s
1 :STANDARD
s
2 :STANDARD
s
3 :STANDARD
s
4 :STANDARD
s
5 :STANDARD
s
STANDARD
SCENE RECALL : EXEC
SCENE STORE : EXEC
F.ID: SCENE21
TOP