


124
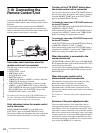
Testing the Camcorder Before Shooting
Chapter 8 Maintenance
8-1-3 Testing the VTR
Perform tests (1) to (7) consecutively.
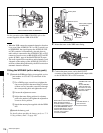
(1) Testing the tape transport functions
1
Set the VTR SAVE/STBY switch to VTR SAVE and
check that the SAVE indicator in the viewfinder goes
on.
2
Set the VTR SAVE/STBY switch to STBY and check
that the VTR SAVE indicator in the viewfinder goes
off.
3
Set the F-RUN/SET/R-RUN to R-RUN.
4
Set the DISPLAY switch to CTL.
5
Press the VTR START button and check the following
points.
• The tape reels are turning.
• The counter indication is changing.
• The REC indicator in the viewfinder is on.
• The RF and SERVO indicators on the display panel
are off.
6
Press the VTR START button again and check that the
tape stops and that the REC indicator in the viewfinder
goes off.
7
Repeat the checks of steps 5 and 6, this time using the
VTR button on the lens.
8
Press the RESET button and check that the indication
in the counter display is “00:00:00:00.”
9
Turn on the LIGHT switch and check that the display
panel is illuminated.
10
Hold down the REW button to rewind the tape for a
while, then press the PLAY button. Check that the
rewind and playback functions operate normally.
11
Press the STOP button and press the F FWD button.
Check that the fast forward function operates
normally.
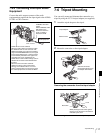
(2) Testing the automatic audio level
adjusting functions
1
Set the AUDIO IN CH-1 and CH-2 switches to
FRONT.
2
Set the AUDIO SELECT CH-1/CH-2 switches to
AUTO.
3
Set the CH-1/2 / CH-3/4 switch to CH-1/2.
4
Aim the microphone connected to the MIC IN
connector at a suitable sound source. Check that the
level indications for channels 1 and 2 correspond to the
sound level, respectively.
5
Set the AUDIO IN CH-3 and CH-4 switches to F.
6
Set the CH-1/2 / CH-3/4 switch to CH-3/4.
7
Aim the microphone connected to the MIC IN
connector at a suitable sound source. Check that the
level indications for both channels 3 and 4 correspond
to the sound level.
8
Be sure to reset the CH-1/2 / CH-3/4 switch to CH-1/2
after checking the channels 3 and 4.
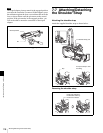
(3) Testing the manual audio level
adjusting functions
1
Set the AUDIO IN CH-1 and CH-2 switches to
FRONT.
2
Set the AUDIO SELECT CH-1 and CH-2 switches to
MANUAL.
3
Turn the MIC LEVEL control. Check that the channel-
1 and -2 audio level meter in the display panel show
more and more segments as you turn the control
counterclockwise as seen from the front of the
camcorder.
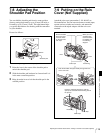
(4) Testing the earphone and speaker
1
Turn the MONITOR volume control and check that the
speaker volume changes accordingly.
2
Connect an earphone to the front or rear EARPHONE
jack.
Check that the speaker sound is cut off and that you
can hear the sound from the microphone in the
earphone.
3
Turn the MONITOR volume control and check that the
earphone volume changes accordingly.
4
Connect the earphone to the other EARPHONE jack.
Check the earphone as in step 3.
(5) Testing external microphones.
1
Connect external microphones to the AUDIO IN CH1/
CH2 connectors.