


Chapter 1 Overview
16 Chapter 1 Overview
wa UP/ON button
Use this button to open displays and to make “ON”
settings. When using the advanced menus, use this
button to change menu pages or to switch to the
ordinary screen display.
ws DOWN/OFF button
Use this button to close displays and to make “OFF”
settings. You can also use this button to change menu
pages when using the advanced menus.
Location and Function of Parts
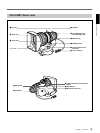
w; ZEBRA switch
Set this switch to the ON position to display a zebra
pattern (diagonal stripes) in the viewfinder.
Depending on the zebra setting in advanced menu page
4 (page 65), the zebra 1 for video levels between 70 to
90 IRE (or 70 to 90%) and the zebra 2 for video levels
100 IRE or more (or 100% or more) can be displayed
independently or simultaneously.
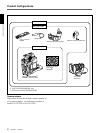
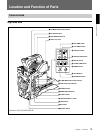
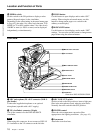
Front view
1 MIC IN +48 V connector
2 VF connector
3 MIC LOW CUT switch
4 FILTER control
5 Lens mount
6 SHUTTER switch
7 TAKE button
8 AUDIO LEVEL knob
9 WHT/BLK switch
0 VTR button
1 MIC (microphone) IN +48 V connector (XLR 3-
pin, female)
Connect the supplied microphone or an optional
microphone (operable with a 48 V supply).
2 VF (viewfinder) connector (20-pin)
This is the connector for the DXF-801/801CE
viewfinder.
Note
When using this connector, do not connect a DXF-41/
51 viewfinder to the VF connector on the left side.
3 MIC LOW CUT switch
Set this switch to the ON position to insert a high-pass
filter in the microphone circuit, reducing wind noise.
Normally leave the switch in the OFF position.
4 FILTER control
Select the color temperature conversion filter
appropriate to the lighting conditions. (See page 43.)
5 Lens mount
Attach the zoom lens here.
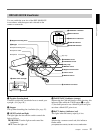
Illustration: DXC-D35WS/D35WSP