


Chapter 5 Adjustments and Settings 91
Chapter 5 Adjustments and Settings
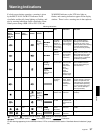
Product
Fujinon: VCL-916BYA, A16X9 BRM,
A12X6.8 BRM
Canon: VCL-918BY, YJ18X9B KRS
Fujinon: A10X4.8 BEVM/BERD, A15X8
BERM/BERD, A16X9 BERM, A20X8
BEVM/BERD, A19X8.7 BERM, A19X8.7
BRM
Canon: J9aX5.2B IRS/IAS, J15aX8B IRS/
IAS
Canon: J21aX7.8B IRS/IAS, YJ18X9B
IRS
Set up the data with Sony dealer.
If you use the lens that is not mentioned above, set the
lens number as follows:
• When using a lens without an extender, set it to 1.
• When using a lens with an extender, set it to 2.
• When using a lens with a ratio converter, set it to 2.
You can also ask a Sony dealer more precise settings
according to your lens. In this case, set it to 4.
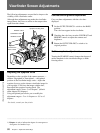
Adjusting the Iris Sensitivity
You usually need not adjust the iris sensitivity because
lenses are equipped with iris sensitivity adjustment
function.
In auto iris mode, if hunting or response delay
happens, adjust the iris sensitivity using the iris
sensitivity trimmer.
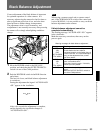
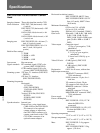
You can see the iris sensitivity trimmer when
removing the gum cap on the front of the lens driving
unit. Use a mini-screwdriver to turn the trimmer. If
you turn it clockwise, the sensitivity increases, and if
you turn it counterclockwise, the sensitivity decreases.
It is recommended that you confirm the iris sensitivity
after replacing the lens.
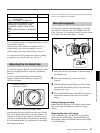
23
1
4
ZOOM
MANU.SERVO
IRIS
GAIN
Iris sensitivity trimmer (S
or IRIS GAIN is indicated.)
Lens number
1
2
3
4
For more information, refer to the operating instructions for
the lens (or consult the lens maker).
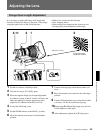
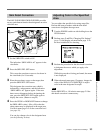
Macrophotography
Use the macro function when the subject is less than
about 90 cm (3 feet) (for the VCL-918BY) from the
front of the lens. It is possible to shoot close-ups down
to a range of 10 mm (wide angle, f = 9 mm).
1 Bring the lens up to the subject so that the image is
the required size.
2 Move the focusing ring to the closest focus
position.
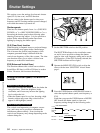
3 Slide the M button toward the rear of the camera,
and turn the MACRO ring fully in the direction
shown by the arrow.
4 Move the ZOOM selector to the MANU. position,
and turn the manual zoom control to focus the
image.
Ending close-up shooting
Return the MACRO ring to its original position (turn
fully in the opposite direction to the arrow in the
figure).
Reducing the size of the image
After completing steps 1 to 4 above, if you wish to
reduce the size of the image, turn the MACRO ring
back slightly, then use the manual zoom control again
to focus the image.