


48 Chapter 3 Shooting
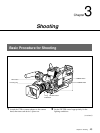
Chapter 3 Shooting
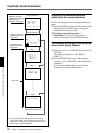
Setting cue points as you shoot
You can make edit search operations easier by
specifying cue points to highlight scenes.
1 Perform steps 1 and 2 in “Using the ClipLink
Function” (page 46).
2 Access basic menu page 6 and perform the
following operations.
1) Set MARK/CUE to CUE.
The ClipLink mode indication “CLIP C”
appears on the viewfinder screen.
2) Set the cassette name or number if necessary.
For details of menu operations, see “Basic Menu
Operations” (page 58).
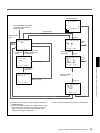
3 Press the VTR button on the camera head or the
lens.
The DSR-1/1P starts recording, and the REC/
TALLY indicator lights in the viewfinder.
Meanwhile, the recording start point (Rec IN) is
recorded in the DSR-1/1P’s internal memory.
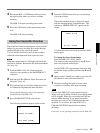
4 Press the TAKE button when you find a shot
where you would like to set a cue point.
The “CUE” indication appears (for about 1 second)
on the viewfinder screen. At this point, the time
code (HH:MM:SS:frame) at the cue point is
recorded into the cassette memory.
5 Repeat step 4 to specify more cue points.
6 To finish shooting, press the VTR button on the
camera head or the lens, then press the
DSR-1/1P’s STOP button.
This stops recording operation.
Time codes (HH:MM:SS) and scene number
(scene 001) are recorded to the cassette memory
and the index picture of the Rec IN point is
recorded onto the tape.
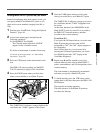
Shooting with the DSR-1/1P
Using the Edit Search Function
While Back Space Editing
While the DSR-1/1P is in recording pause mode, press
and hold the EDIT SEARCH buttons to activate the
search playback function for as long as you hold down
the button. You can use the edit search function to
find the desired tape location after a recording stop
during back space editing or when continuing to record
from any other location on the tape.
1 Dock the DSR-1/1P to the camera head and turn on
the power, then insert a cassette into the DSR-1/1P.
2 Perform steps 2 to 12 in “Basic Procedure for
Shooting” (page 43).
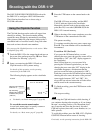
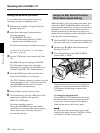
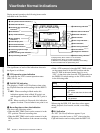
3 Press and hold either of the EDIT SEARCH
buttons (REV or FWD)
The tape is moved in reverse or forward search
mode for as long as you hold down the REV or
FWD button, and the image is shown in the
viewfinder.
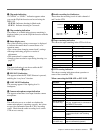
To change the playback speed
Press the REV or FWD button down firmly into
the inner position to make the tape move at the
faster speed. Press the button down lightly to
make the tape move at the slower speed.
Note
Do not shut off the camera head’s power while
using the edit search function. The DSR-1/1P may
not be able to find the continue point.
REV button
FWD button