15
Getting started
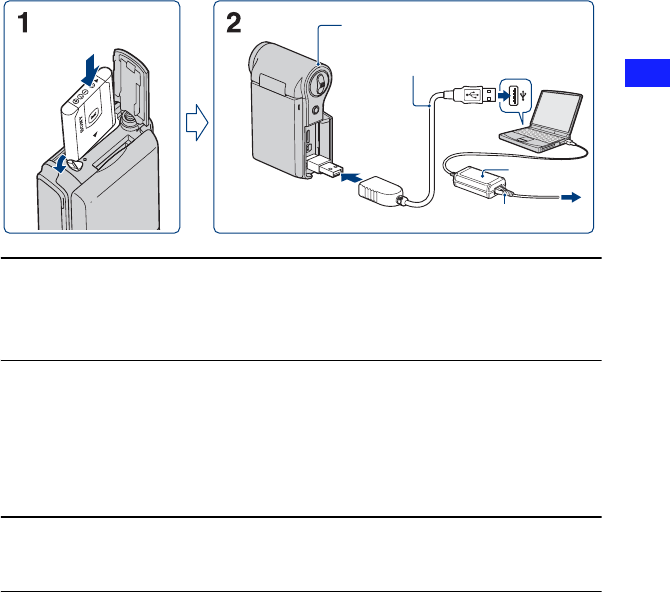
1 Preparing the battery pack
1 Open the battery/memory card cover and insert the battery pack into this
camera, then close the cover.
• Insert the battery pack as far as it will go, then press the back of the battery pack gently until it clicks.
2 Connect the camera to the computer that is turned on with the USB
connection support cable (supplied).
• The Power/Charge lamp lights up in orange, and charging starts.
• When the Power/Charge lamp turns off, charging is finished.
• The Power/Charge lamp may turn off when the temperature is outside of the recommended operating
temperature (10 to 30°C.)
3 When charging is finished, disconnect the USB connection support cable
from the USB jack of your camera.
b Notes
• While the camera is connected to a computer, you cannot operate the camera. Be sure to disconnect the
camera before operation.
• Charging the battery with customized or hand-built computers is not guaranteed. Depending on the type of
USB device used, charging may not function properly.
• Do not apply force to the camera, when you connect the camera to a computer. This may cause damage to
the camera or the computer.
• When you connect the camera to a notebook computer that is not connected to an AC power source, the
battery of the notebook computer may be depleted rapidly. Do not leave the camera connected to the
computer for a long time.
• You cannot open the battery/memory card cover when a tripod is attached to the camera.
Power/Charge lamp
USB connection support cable
(supplied)
AC Adaptor
Power cord (Mains lead)


