


Advanced Operations
78
Chapter 4 Shooting
• Set the POWER switch to OFF
• With the camcorder in recording standby mode,
set OPERATION >Rec Function >Interval Rec
in the setup menu to “Off”.
Limitations during recording
• The i.LINK (HDV/DV) connector cannot be
used.
• Regardless of the setting of the F-RUN/SET/
R-RUN switch, the advance mode of the
internal timecode generator is always R-RUN.
• Audio cannot be recorded.
• Recording review is not possible.
• If you press the SLOT SELECT button, the
camcorder completes recording of the specified
number of frames, creates a clip, and switches
to the other media.
• Genlock is not possible.
If power is lost during recording
• If you set the camcorder’s POWER switch to
OFF, the camcorder is powered off
automatically after a few seconds, during which
the media is accessed to record the video and
audio data stored in the camcorder’s memory up
to that point.
• If power is lost because the battery was
removed, the DC cable was disconnected, or the
power was turned off on the AC adaptor side,
then the video and audio data shot up to that
point may be lost (maximum 10 seconds). Be
careful to avoid this when exchanging the
battery.
When the camcorder is in HD mode and the video
format (see page 50) is set to one of the formats
listed below, you can specify a recording frame
rate that is different from the playback frame rate.
When the Country setting is NTSC: HQ 1920/
29.97P, HQ 1920/23.98P, HQ 1280/59.94P,
HQ 1280/29.97P, HQ 1280/23.98P
When the Country setting is PAL: HQ 1920/
25P, HQ 1280/50P, HQ 1280/25P
By shooting with a frame rate that differs from the
playback frame rate, you can obtain slow and
quick motion effects that are smoother than low-
speed or high-speed playback of content recorded
at the normal frame rate.
Example
When the video format is HQ 1280/23.98P, you
can obtain quick-motion effects by setting the
frame rate to 1 to 23, and obtain slow-motion
effects by setting the frame rate to 25 to 60.
Slow & Quick Motion settings and
shooting
Notes
• The Slow & Quick Motion function cannot be used at
the same time as the picture cache, Interval Rec, or
Frame Rec function. When you select Slow & Quick
Motion mode, the picture cache, Interval Rec, and
Frame Rec functions are disabled. When you select
picture cache, Frame Rec, or Interval Rec mode, the
Slow & Quick Motion function is disabled.
• Slow & Quick Motion is disabled when the slow
shutter function (viewfinder display “SLS”) function is
enabled. The slow shutter function is disabled when
the Slow & Quick Motion function is enabled.
• Slow & Quick Motion is disabled when OPERATION
>Input/Output >i.LINK I/O in the setup menu is set to
[Enable]. When Slow & Quick Motion is enabled,
i.LINK I/O is fixed as [Disable].
• Slow & Quick Motion settings cannot be changed
during recording.
To make Slow & Quick Motion settings
1 Select OPERATION >Rec Function >
Slow & Quick in the setup menu.
For menu operations, see “Basic Setup Menu
Operations” (page 94).
2 Turn the MENU knob to select [On],
and then press the knob.
The camcorder enters Slow & Quick Motion
mode, and the “S&Q Motion” indication in
the viewfinder flashes.
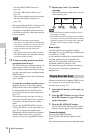
3 Select [Frame Rate], turn the MENU
knob to select the recording frame rate,
and then press the knob.
The setting range for the frame rate is as
follows.
When you finish making these settings, the
system frequency and the frame rate appear at the
top of the viewfinder screen. You can change the
frame rate while viewing the display in the
Shooting with Slow & Quick
Motion
System lines Frame rate
1080 1 to 30
720 1 to 60