


GB
14 Installing the Camera
Installing the
Camera
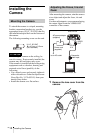
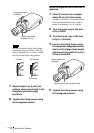
To attach the camera to a tripod, mounting
bracket, suspension bracket, etc., use the
appropriate screw (U1/4”, 20 UNC) that fits
the installation/tripod hole on the bottom of
the camera.
The following mounting screw can be used.
If installing the camera on the ceiling, be
sure it is secure. If not securely installed, the
camera may fall and injury may occur.
If the camera is installed on the ceiling using
equipment such as a bracket, housing and
motored swivel base (pan/tilt), do the
following:
• Use a tripod screw and securely tighten it
with a screwdriver. Order the tripod screw
(Sony Part No. 3-174-693-01) from your
nearest Sony dealer.
• Install the camera on a flat surface.
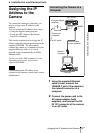
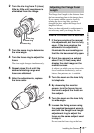
After mounting the camera, aim the camera
at an object and adjust the focus, iris and
zoom.
For these adjustments, we recommend using
the output signal from the VIDEO OUT
connector of the camera.
1 Remove the lens cover from the
camera.
Mounting the Camera
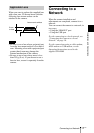
ATTENTION
U1/4”, 20 UNC
= 4.5 mm ± 0.2 mm
(ISO standard)
Adjusting the Focus, Iris and
Zoom
AC power adaptor
(supplied)
SNC-VL10P
Power cord
(supplied)
to an AC outlet
DC IN
12 V
Composite
video input
Video monitor, etc.
VIDEO
OUT