


7
GB
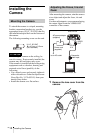
Location and Functions of Parts and Controls
Overview
Location and
Functions of Parts
and Controls
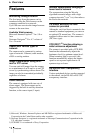
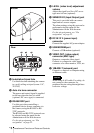
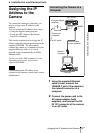
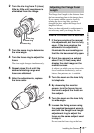
1 Lens cover
To remove, press both sides of the cover.
2 Lens
A vari-focal lens is mounted as standard
equipment.
3 Focus ring
Turn this ring toward NEAR to focus on
a closer object; toward FAR to focus on
a farther object.
4 Zoom ring
Turn this ring toward TELE for
telephoto, or toward WIDE for wide-
angle.
5 Iris ring
Turn this ring to adjust the iris manually.
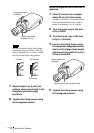
6 Flange focal length adjustment
ring and fixing screw
The flange focal length adjustment is
necessary when you have changed the
lens. Loosen the fixing screw, turn the
ring to adjust the flange focal length, and
tighten the screw.
The flange focal length has been
adjusted at the factory for the supplied
lens. Readjustment is necessary when
you change the lens only.
7 System start/image
compression indicator (orange)
This indicator lights when the power is
supplied to the camera and the system is
starting. It goes off when the system has
started.
Later, when a user accesses the camera,
the image compression starts and the
indicator flashes.
8 Power/network indicator (green)
This indicator lights when the power is
supplied to the camera and goes off after
a while.
Later, when the camera is connected to a
network, this indicator flashes every two
seconds. If the camera is disconnected
from the network, it flashes every four
seconds.
Front
1
2345 6 7 8
Note