


20
Making Printer Setting from your Computer
With Windows
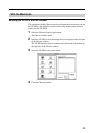
Before printing from an application, it is necessary to set the printer
properties. The printer properties can be displayed by means of either of the
following methods:
• Select [Start] t [Settings] t [Printers]. Select the UP-DP10 icon, and
then select [File] t [Properties]. Settings made through this method
become the initial printer settings for printing in all applications.
• From an application’s [File] menu, select the item that is used for printer
setup. In some applications, these settings can be made in the print dialog
box. Settings made by this method are generally only valid until you quit
the application.
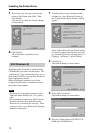
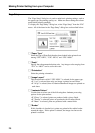
The “SONY UP-DP10: Properties” dialog box has tabs that are standard for
the OS, and tabs that are specific to the UP-DP10. The following section
explains the tabs that are specific to the UP-DP10: [Paper] and [Graphics].
Note also that although the sample screens are taken from Windows 98, the
setting items, methods, etc., are identical in Windows 95.
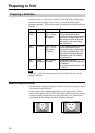
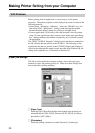
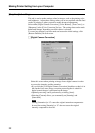
[Paper] tab settings
This tab is used to make basic printing settings, such as the paper type,
number of copies, the printing quality, etc. Make sure these settings have
been made before printing anything.
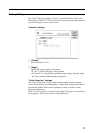
< [Paper Type]
Select the type of Print Pack that has been loaded in the printer from
among Photocard [UPC-10P23], Photocard [UPC-10P34], and Glossy
photosticker [UPC-10S01].
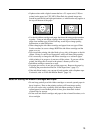
< [Orientation]
Select the printing orientation as either [Portrait] or [Landscape].